Insites User Guide
Building Your Insite
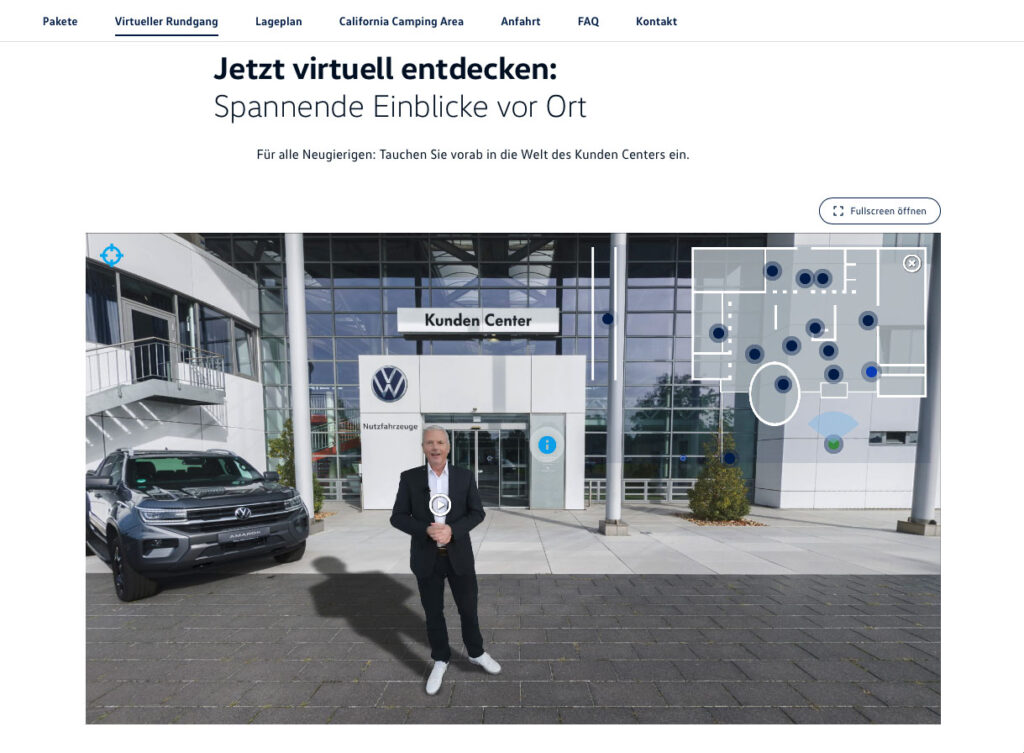
Insites are 3D web simulations made from 360° photographs. They relate your media content to elements in the space. Screens can be live, objects move and change, video, text, and images are located where it makes sense.
Building an Insite is a collaboration. Our clients decide what they would like to and can do themselves, and we take care of the rest. Everything from photography to world-building to authoring is available as a self-build process. This guide explains how to go ahead and create incredible immersive experiences using Insites.
Production Stages

Generate panoramic images
with photography, 3D computer graphics or AI
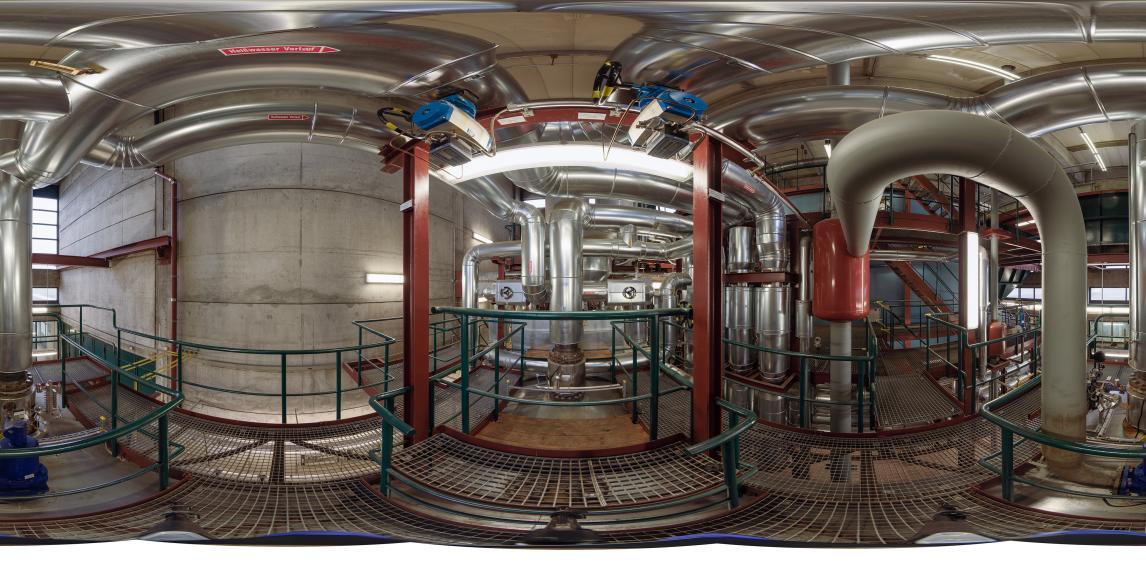
The best way to capture real space is with a great camera. We use professional equipment and techniques to make the best of any space we photograph. We can also create a space completely out of computer-generated 3D objects. Sometimes we combine both to augment the reality of the original space with extra objects.
Generate an online 3D simulation
using our Builder tool
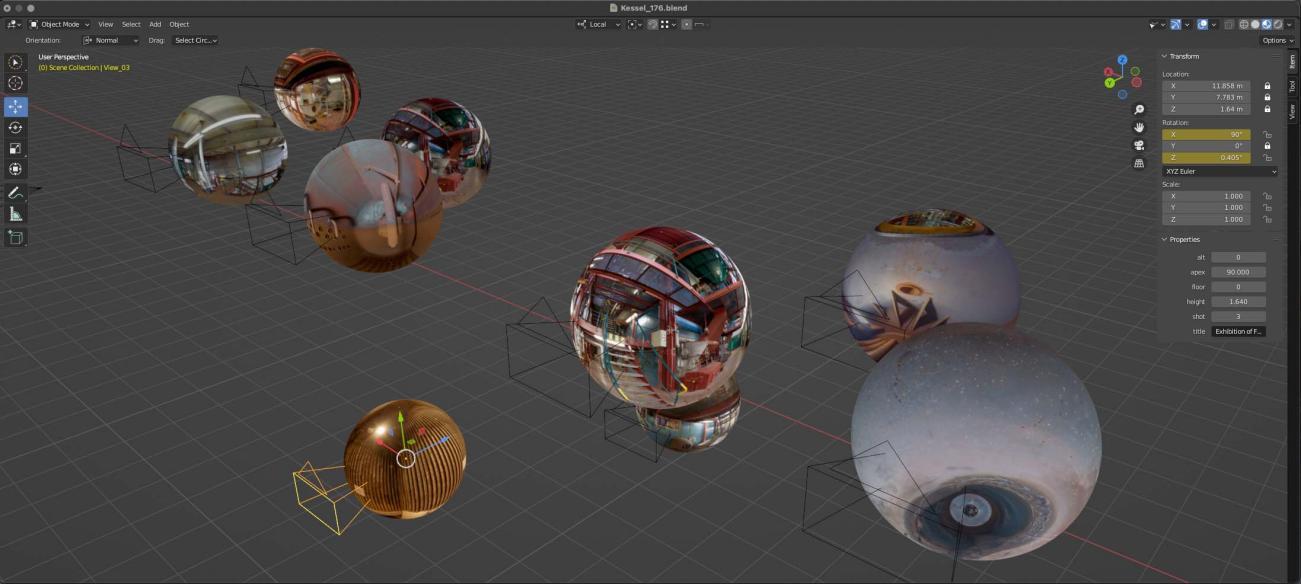
A series of panoramic images are transformed into a 3D virtual tour, creating an interactive online space visualization. This process is done using Builder, a Blender plug-in designed for generating immersive environments. Once the environment is set up, you can enhance it by adding optional elements such as embedded screens, video avatar hosts, and animated sequences, depending on the needs of your project.
Just like any website, the Insites Platform provides a customizable user interface with graphics, fonts, and colors that reflect your business identity. Elements such as maps, menus, and icons can be adjusted to fit the design of your 3D virtual tour or online space visualization. Additionally, animations can be applied to enhance interactivity, creating a more immersive experience.
Define your text and media items
with our content management system
Our tailor-made content management system allows you to create and organize content while incorporating media as needed. You can define how information items appear within your 3D virtual tour or online space visualization, determining their behavior when clicked, hovered over, or displayed in the menu. This flexibility ensures an interactive and immersive experience tailored to your project’s needs.
Place your content in the space
with our online authoring tools
Our live authoring tools allow you to place hotspots throughout the 3D virtual tour, triggering content created in the content management system. At any stage, you can update your content and refine the experience, ensuring a seamless and engaging online space visualization.
Finalise your project and present it online
in an LMS or on your server
Once the authoring process is complete, the site can be published in multiple ways. It can be hosted on our server, or you can generate a delivery package for hosting on your own server or within a learning management system. Additionally, the project can be revisited at any time, allowing for seamless edits and the creation of an updated version of Insites without complications.
Content Management System
Introduction
Getting Started
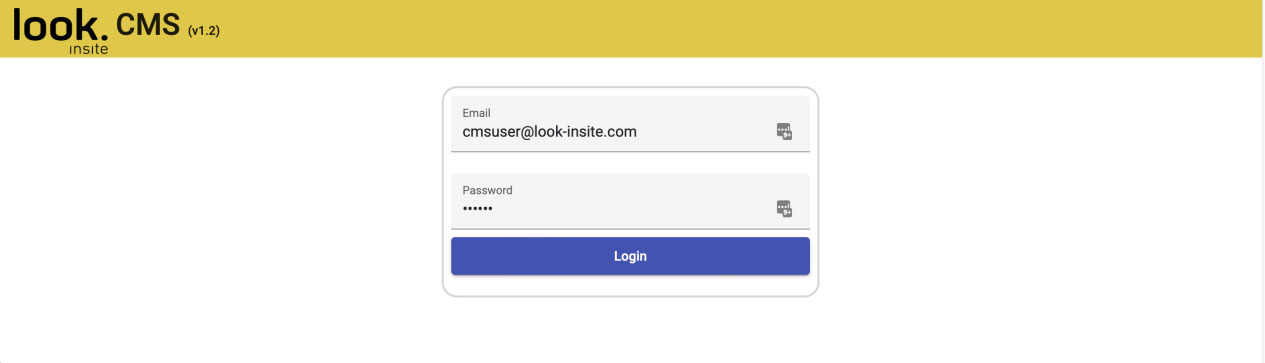
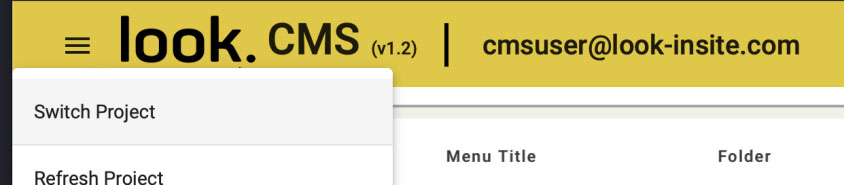
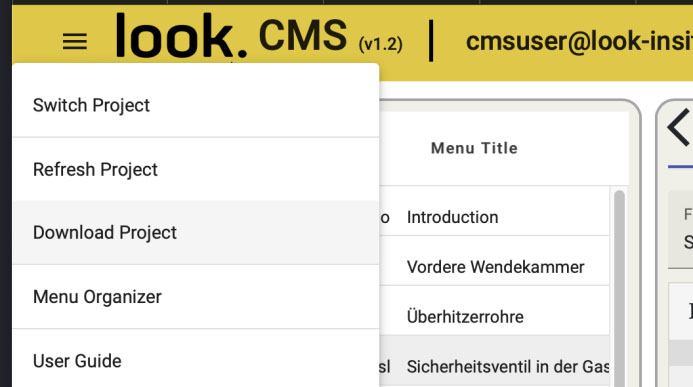
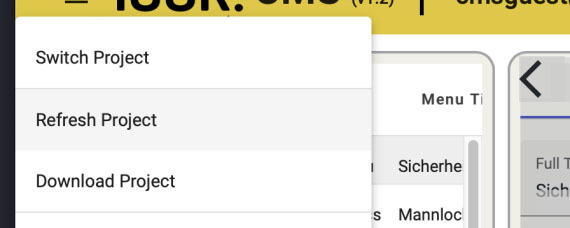
To begin building your insite, follow this link and log in to the CMS using the provided credentials. Each insite is created from a single CMS project. If you are working on multiple projects or wish to refer to an earlier project, you can switch between them using the menu in the top left corner.
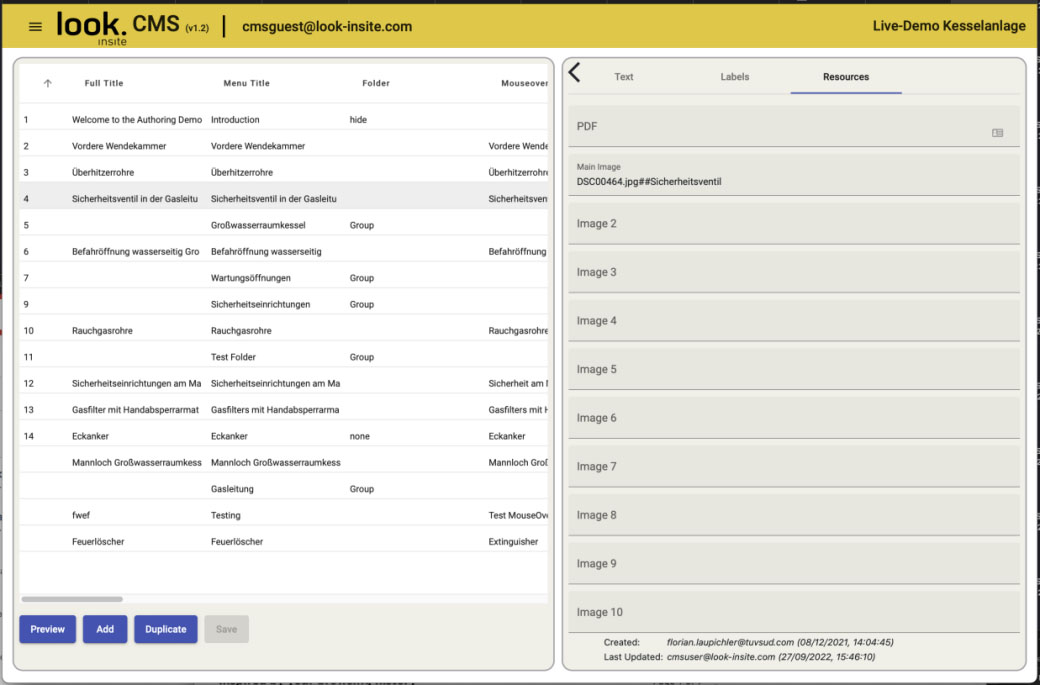
Layout
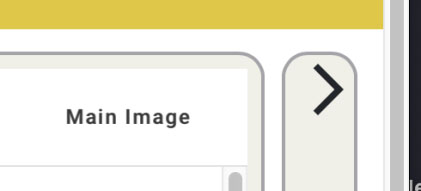
The CMS is laid out in both a spreadsheet and a text entry form. You can hide the text entry panel on the left-hand side by clicking the arrow in the top right corner of the panel.
Spreadsheet
The left-hand panel works similarly to common spreadsheet editors. You can drag the columns to rearrange them,
You can also order the rows alphabetically by clicking on the column headings.
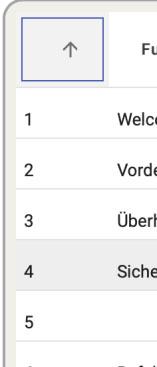
To enter text in the spreadsheet, simply double-click on the cell and fill it in.
When you have completed it, click on another cell or hit save. Clicking on any cell will select its product in the text entry form.
Adding, Deleting, and Enabling Products
To add a product, click the “add product” button in the bottom left corner.
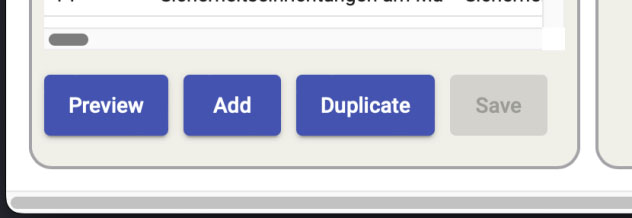
To delete a product, click the waste bin symbol on the far right of the spreadsheet.
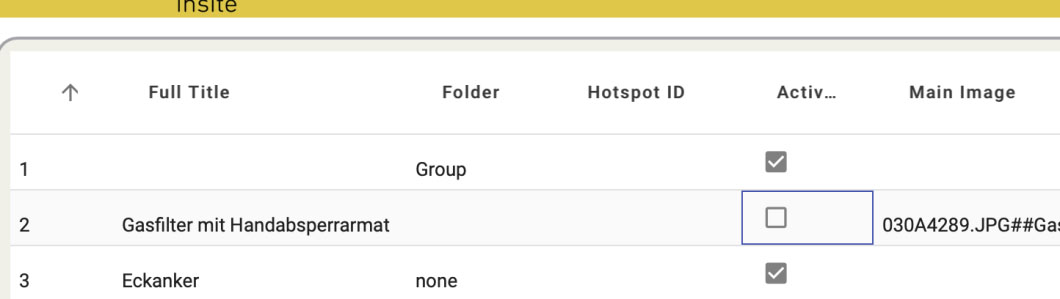
The “active” checkbox controls whether a product’s details will be displayed in your insite. Unticking it disables the product.
Labels and Titles
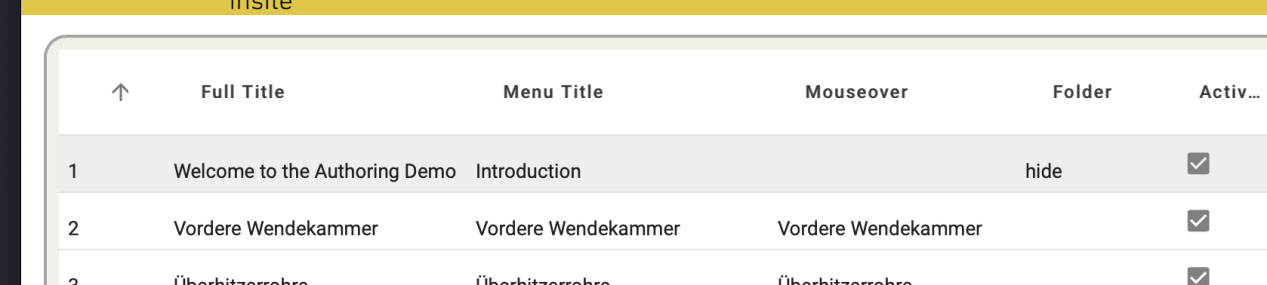
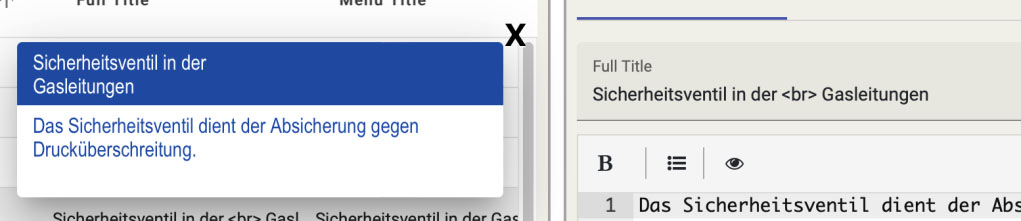
Your product is referenced in your insite in various ways. Full Title, Menu Title and Mouseover are set in the content management system and the result is visible in the Insite once it’s been reloaded.
 Full Title
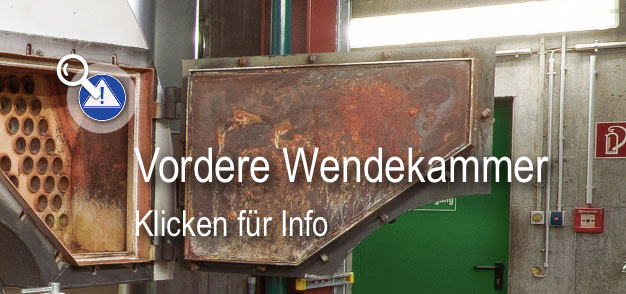 Mouseover
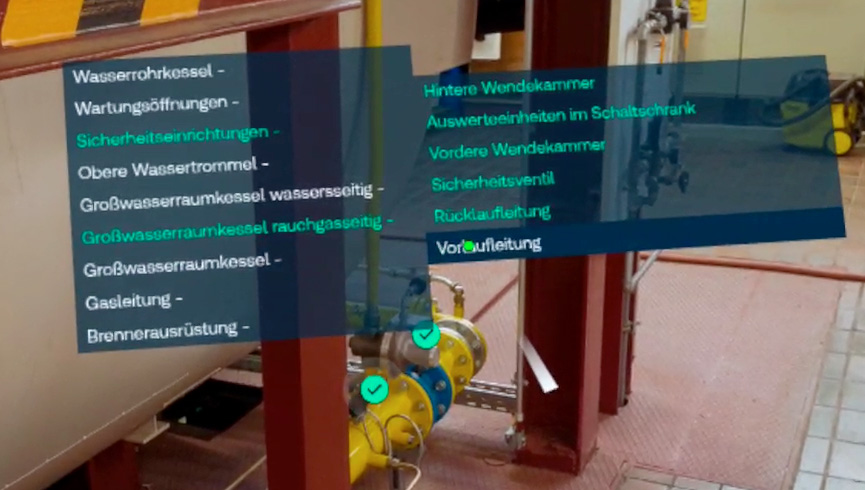 Menu Title
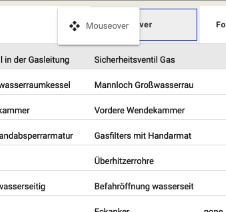
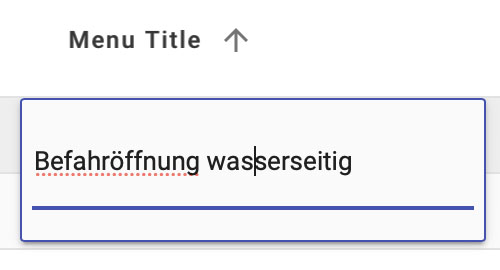
- Full Title – The name that appears at the top of the floating info panel.
- Menu Title – How the info item appears in the menu. This may be shorter or more concise or need to clearly differ from other items
- Mouseover – the wording that appears when the use of hovers over the info point. This also can include a sub line like “click for information”
Automatic labelling
When Menu Title and Mouseover are left empty they will automatically display the wording from Full Title. So to save time you only need to enter a value for Full Title. But if you want to have special wording you always have the option.
Text Formatting in Menu Title and Image Label Fields
Commas and apostrophes in the Menu Title and Image Label fields will not render accurately in your Insite. Please use the following formatting shortcuts to replace them.
Comma (,) = §
Apostrophe (‘) = ª
Backing Up Your Project
It’s important sometimes to know that you can make changes and then restore the status from before. In order to do that go to the top left hand menu and click download project. This will store the status of the CMS at that point.
Please be aware that restoring a project will delete the current content. If you have any reservations simply contact us and we can organise it for you.
Working in a Team
It is possible to work with a group of colleagues on the same project, but it is important to avoid having two users editing the exact same product at the same time, as you may overwrite each other’s changes.
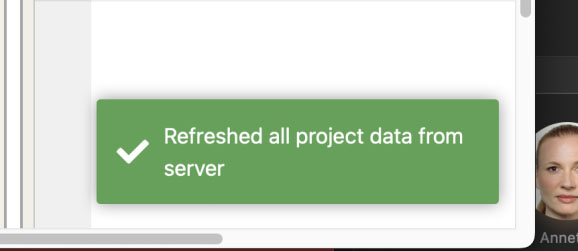
During teamwork, it is helpful to refresh the project regularly from the server to see the most recent changes created by your colleagues. To reload the project, simply select Refresh Project from the top left menu.
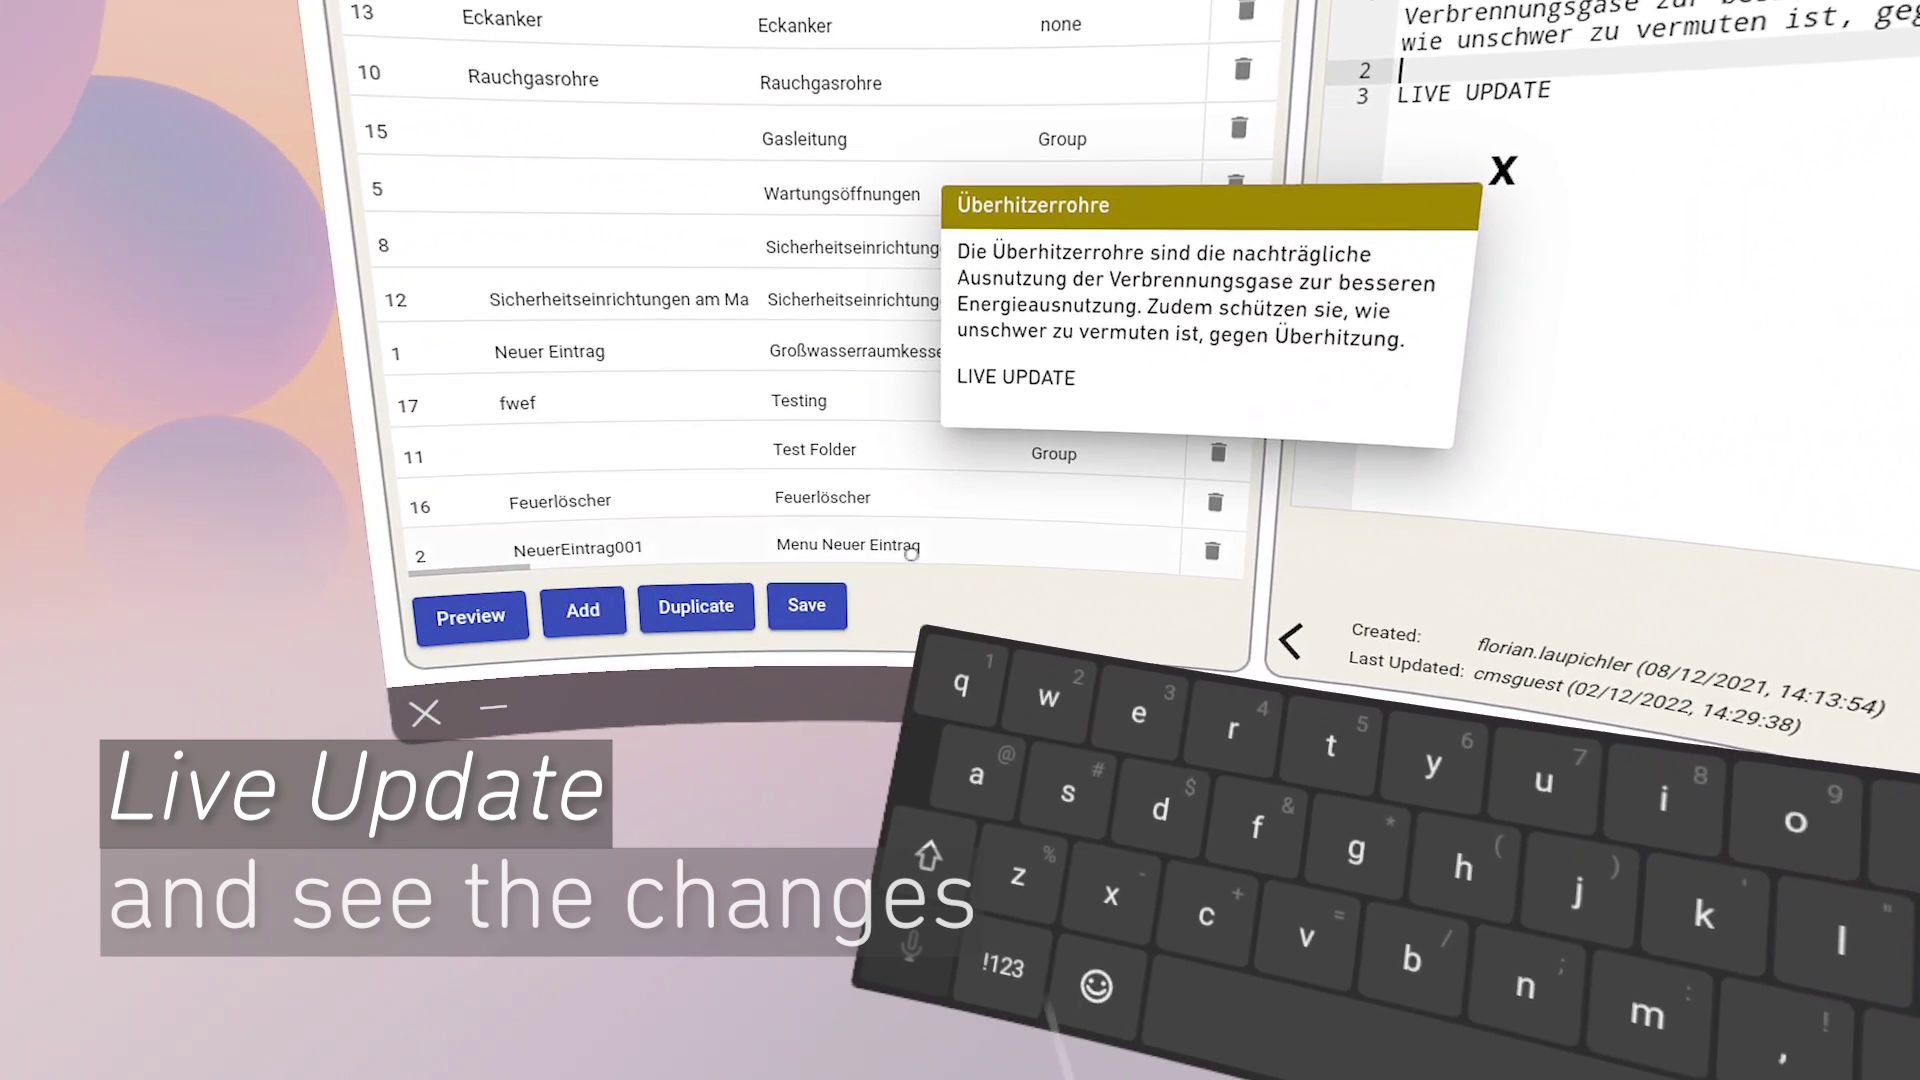
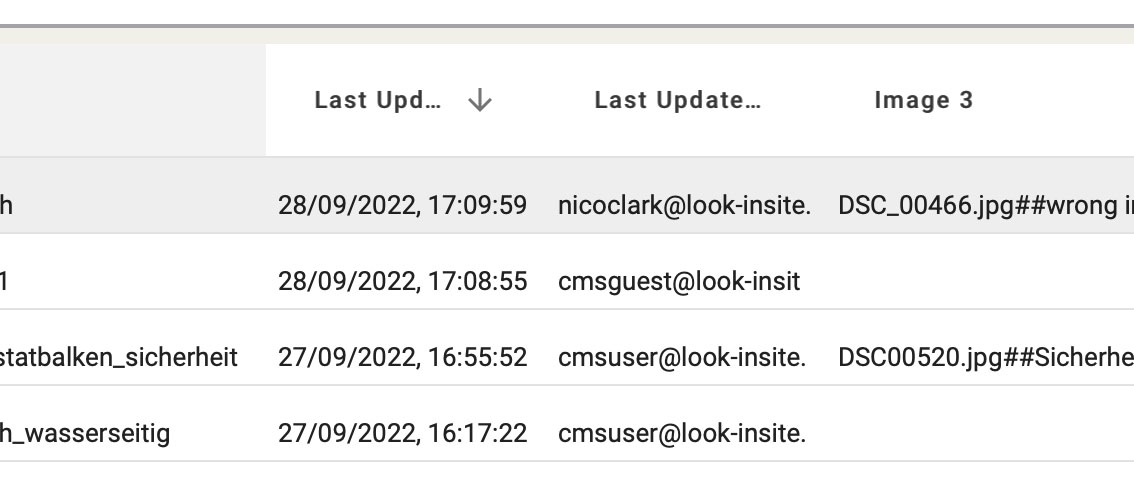
 You can see the timing and author of the last edit to a product in the update columns of the spreadsheet and at the bottom of the text entry form.
Transferring Content from a Spreadsheet
We can populate the CMS based on a spreadsheet upon request. Alternatively, you can manually enter products one by one.
Viewing the Results
During the building process, we will normally set up a live project for you. That means that you can make edits in the CMS and then see the results as soon as you reload your project in our LMS or Server.
If you find that reloading the site does not reflect the changes you’ve made in the CMS or authoring, you might need to empty the cache of your browser. This is done in slightly different ways depending on the browser that you are using. The simplest way to find out is to google ’empty the cache in Firefox’ for example.
Menus & Folders
Organizing Your CMS Menu
The content of your CMS project can be displayed as a menu in your insite.
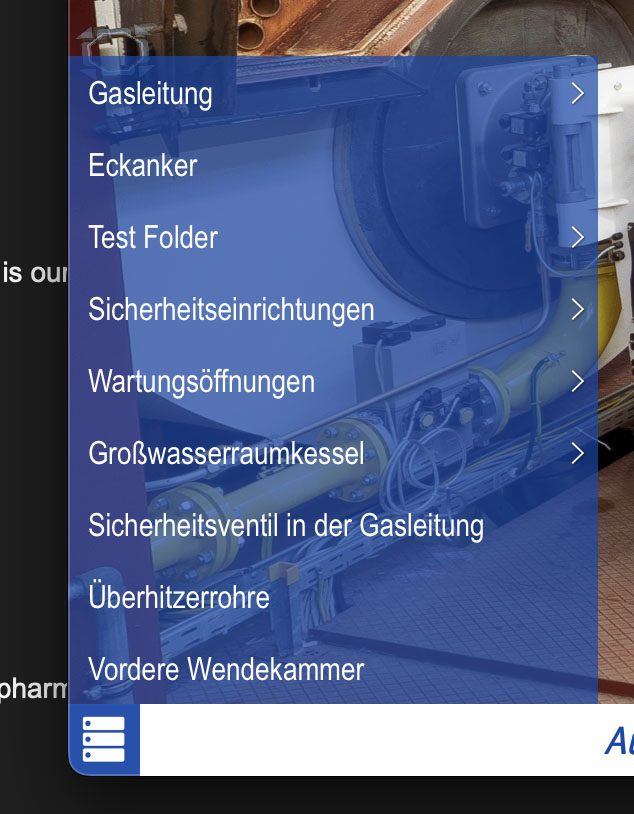
Defining Menu Titles
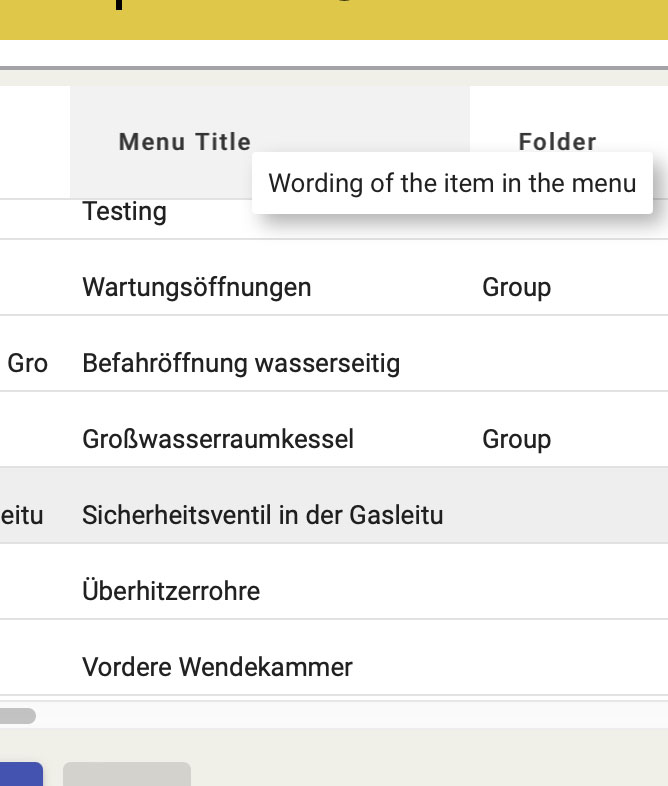
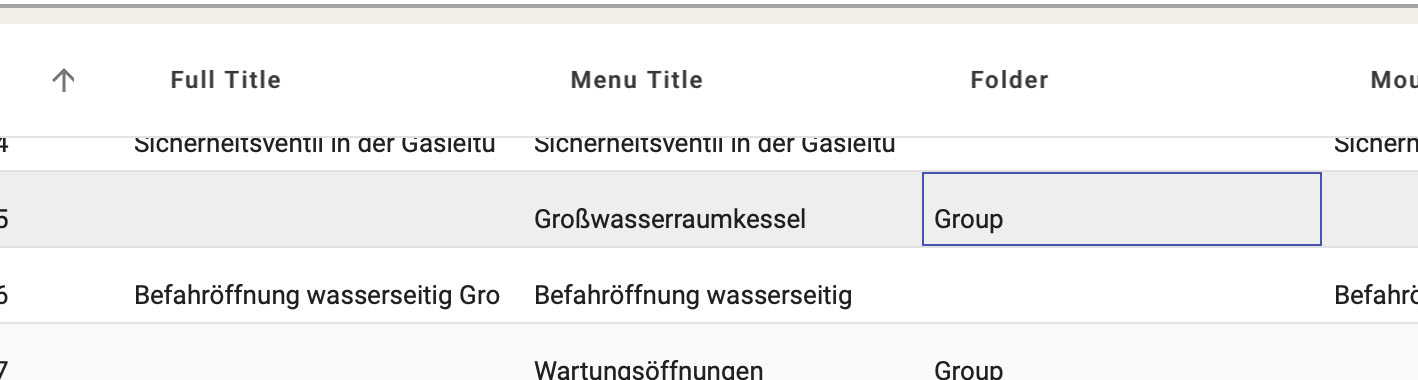
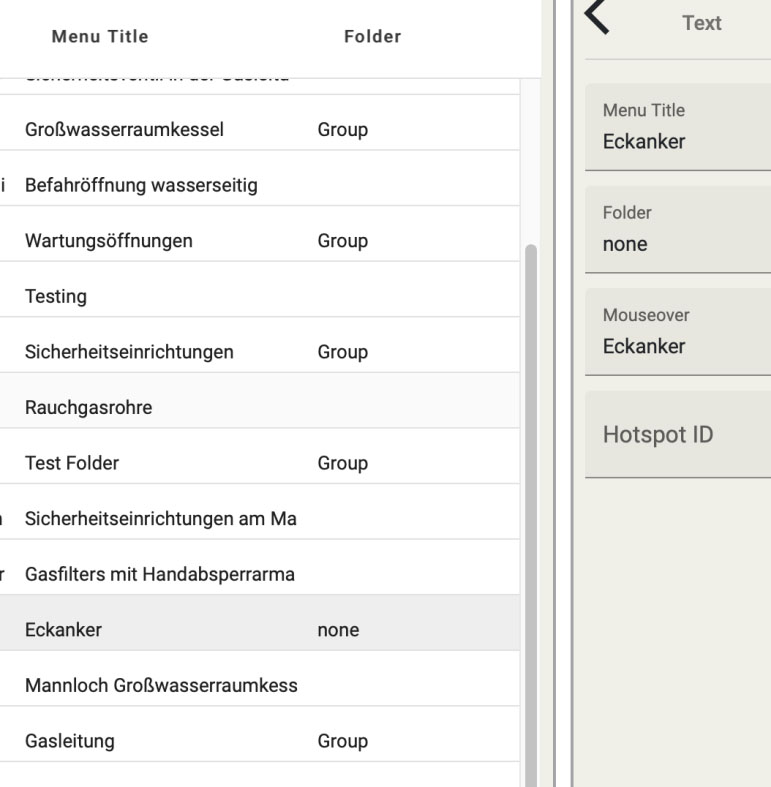
The name of a product in the menu is defined in the Menu Title field.
Menu Limitations
The height of your web browser limits the number of menu items displayed. We recommend a maximum of **12** for desktop-only insites and **8** for multi-platform insites.
If you have more menu items than this, it is helpful to arrange them into **sub-menu folders**.
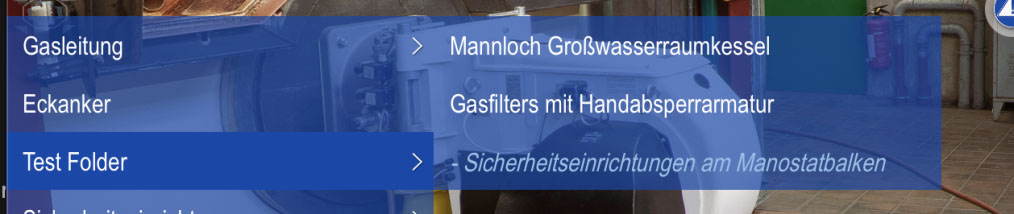
Creating Folders in the CMS
In the CMS, it’s simple to organize items into folders. First, define the **folder items** by using the Folder field and assigning a name in the Menu Title field.
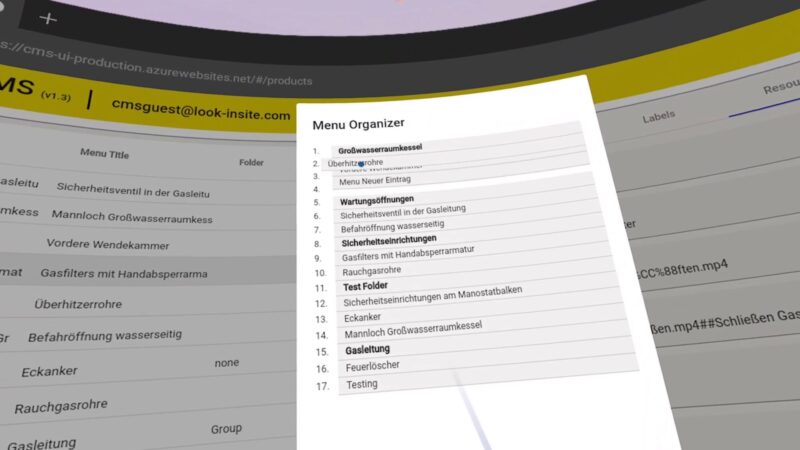
Using the Menu Organizer
You can easily arrange products into folders using the **Menu Organizer**, located in the **top left-hand menu**.

Simply **drag and drop** items to place them within a folder.
Keeping Items Outside of Folders
If you want to keep an item **outside** of a folder, write “none” in the Folder field.
Hiding a Product from the Menu
If you don’t want a product to appear in the menu at all, enter “hide” in the Folder field.

Text
Text Entry Form
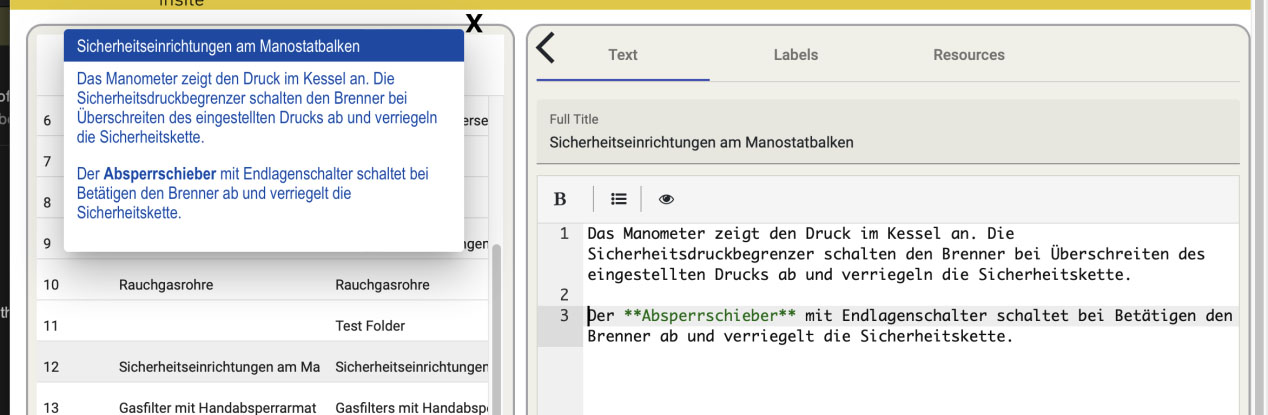
The text entry form allows you to enter all of the information required to build your product.
Simply click in the field you wish to edit and make your changes. Clicking in another field will save your changes.

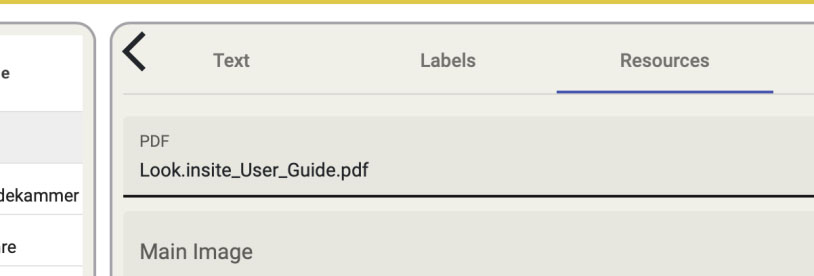
Tabs
The text entry form contains tabs for inputting the main text panel, labels and titles, and image & PDF resources.

The Text Field
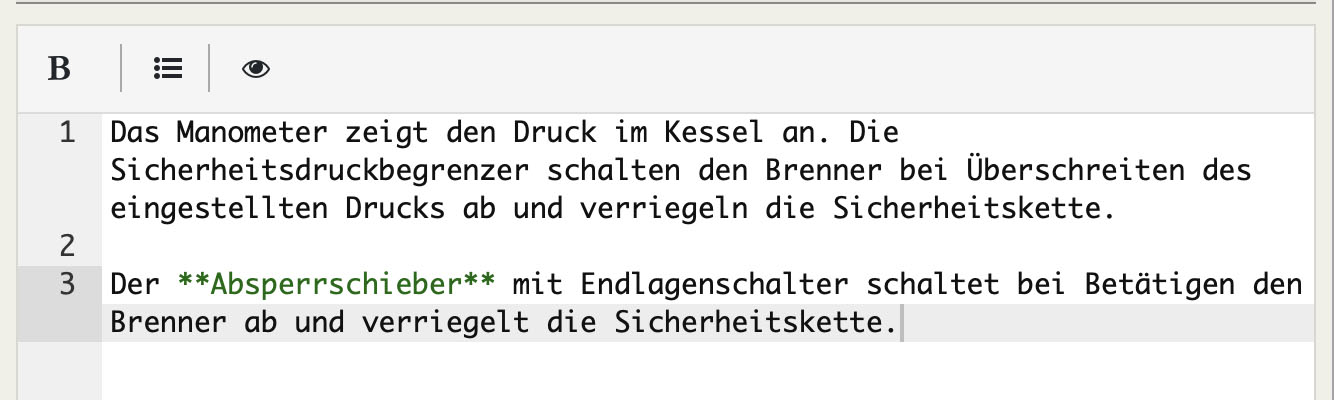
The text field represents the body of content displayed when a product is clicked.
Entering Your Text in the Text Editor
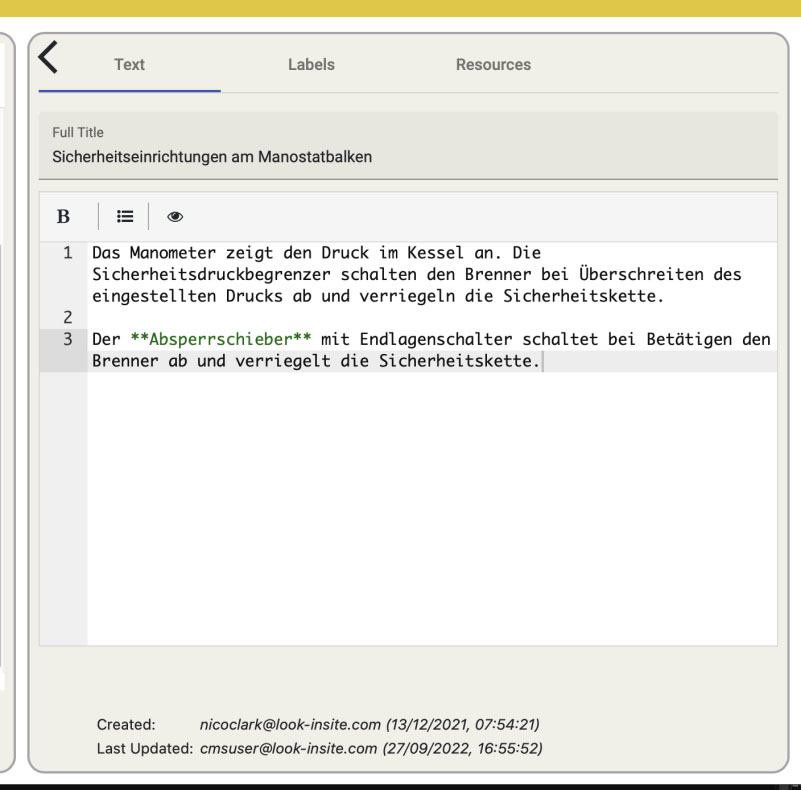
The CMS text field uses the markdown system to create HTML text that displays text in your insite consistently.
Previewing Your Product
The eye symbol at the top of the text window splits the markdown editor and gives a quick preview.
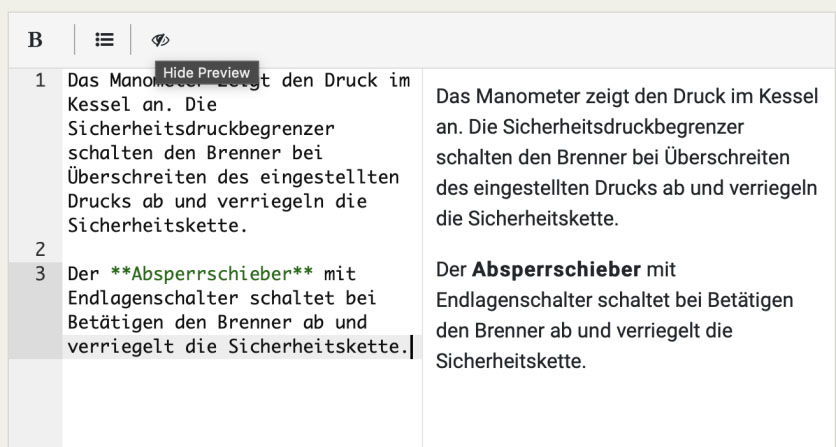
Markdown Text Formatting
The Look.insite CMS provides a custom range of markdown formatting buttons above the text window.
| Format | Character Sequence |
|---|---|
| New Line | Space + Enter |
| Bullet Point | * Space |
| Bold | **your text** |
Custom Formatting and HTML
HTML formatting is possible within the text window for more advanced users.
| Format | Shortcut | HTML |
|---|---|---|
| Non-breaking Space | — | |
| Non-breaking Hyphen | -/- | ‑ |
| Syllable Break | ~ | ­ |
| Asterisk | * | * |
We recommend using HTML only where markdown or custom shortcuts are insufficient.
Line Returns in the Title
Type <br> to add a line return in the full title of a product.
Media
Images, Videos, and PDFs
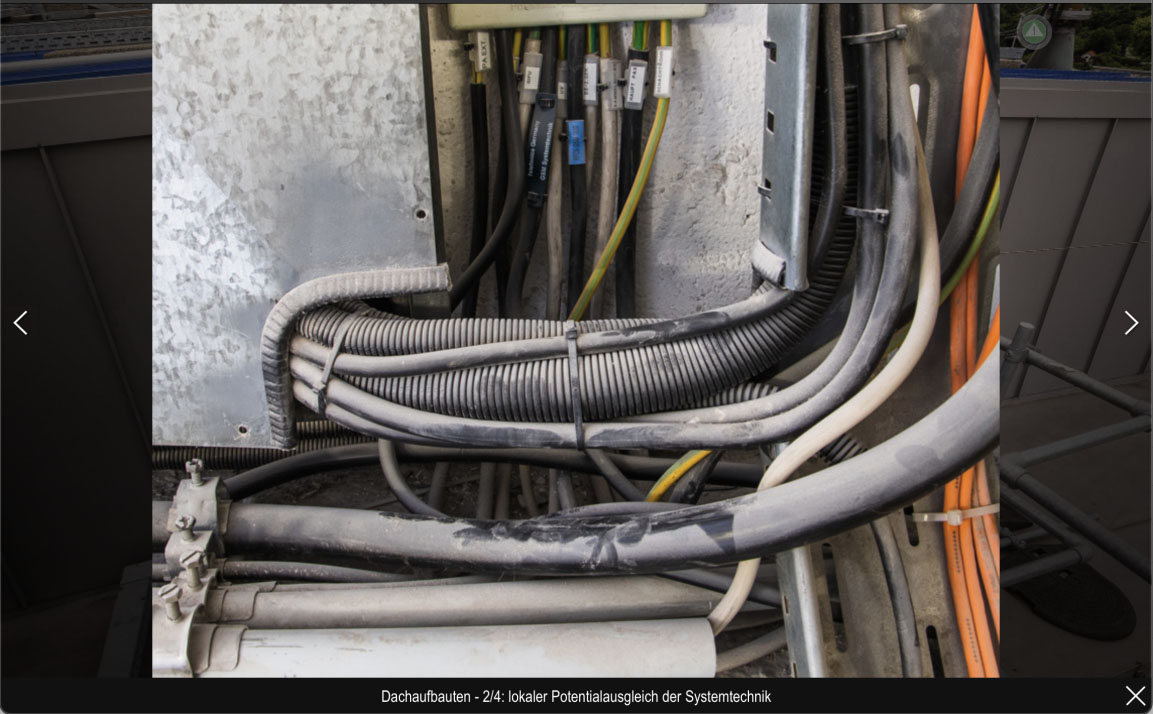
Images and videos are displayed in a floating panel when the hot-point is clicked. Left and right arrows allow navigation through media items or fullscreen viewing. PDFs can be opened in an extra tab or in a floating window.
Adding media to your insite is simple. We provide a storage folder to organize your files. Reference them in the CMS, adding labels and deciding their order. Updates appear immediately in your site.
Resources such as images and PDFs can be displayed within insites or as links to extra browser windows. Simply fill in the resource names accurately in the resources tab and provide us with the relevant files.
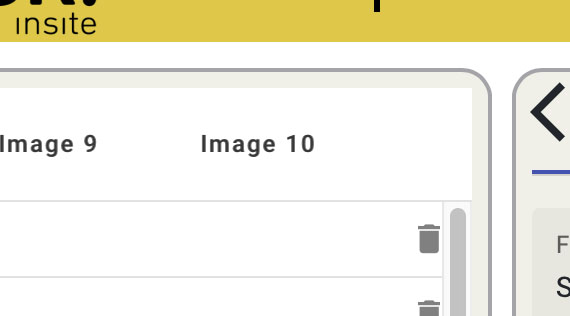
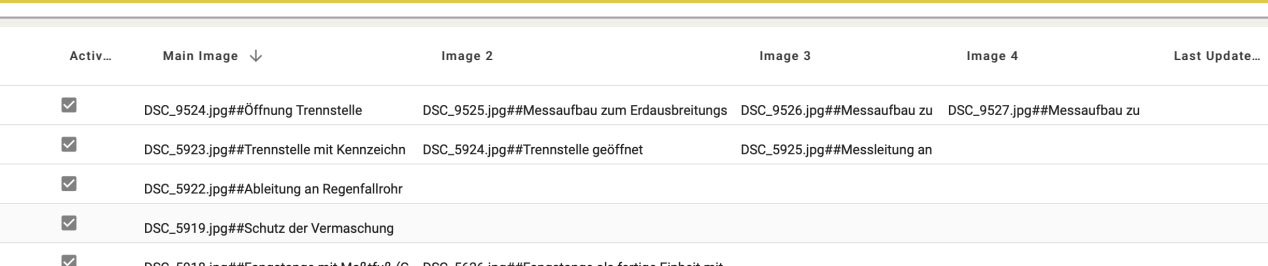
Multiple Images
Multiple images are displayed in your insite using a slideshow in the floating product panel and maximized view.
To enter multiple images in one product, input the exact filenames in the resources fields labeled Image 2, Image 3, etc.
Image Labels
To add a label under an image, type the file name followed by two hashtags. Example: my_image.jpeg##this is my first image
Text Formatting in Menu Title and Image Label Fields
Commas and apostrophes in the Menu Title and Image label fields will not render accurately in your insite. Please use the following formatting shortcuts to replace them.
comma (,) = §
apostrophe (‘) = ª
PDFs
Entering a PDF resource in the CMS generates a button at the bottom right of the text. Clicking this button opens the PDF in a new tab.
Setting up your storage area (Blob)
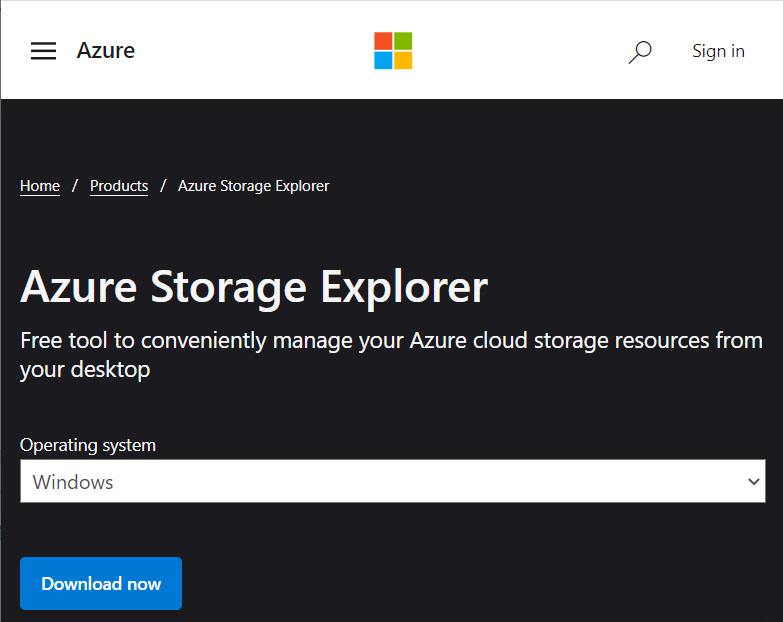
Each project will have a storage area called a blob assigned to it. To access this, use Microsoft Azure Storage, which you can download here.
Simply follow the instructions. You do not need to open an account, just download the app and run it.
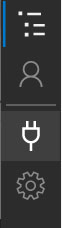
Accessing your storage area
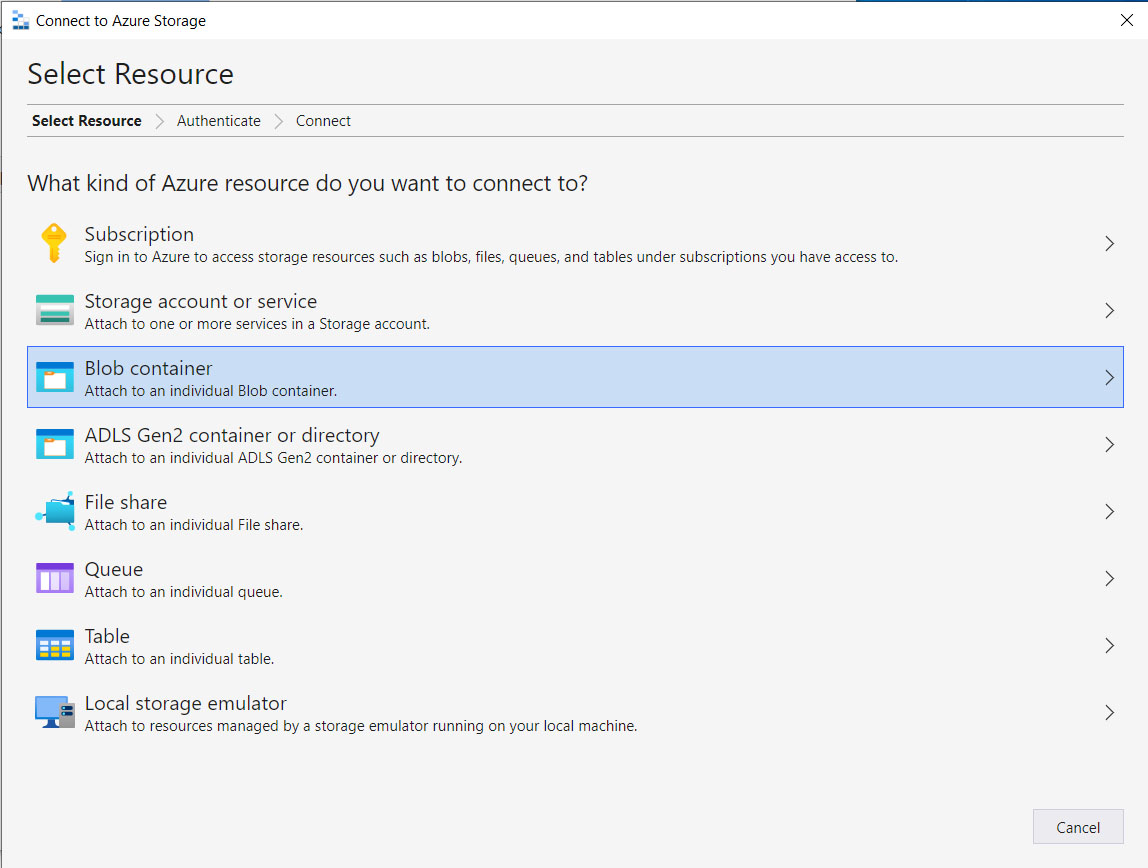
You will receive a link via email, which you can use to access your storage area or Blob. The first time you open the app, you will see a window like this. Click on Attach a resource or the 2-pin plug icon in the top left.
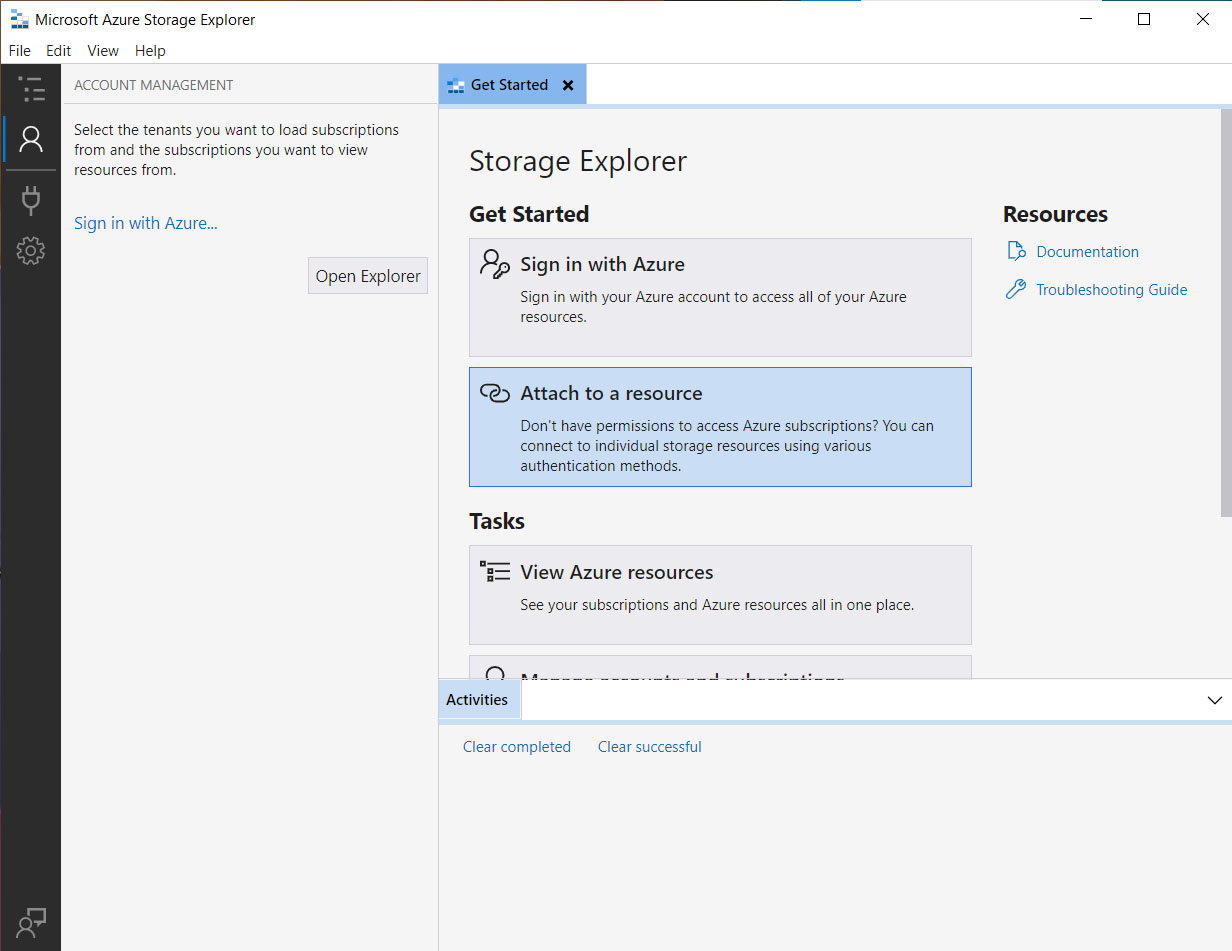
This will open a window like this – click on Blob container.
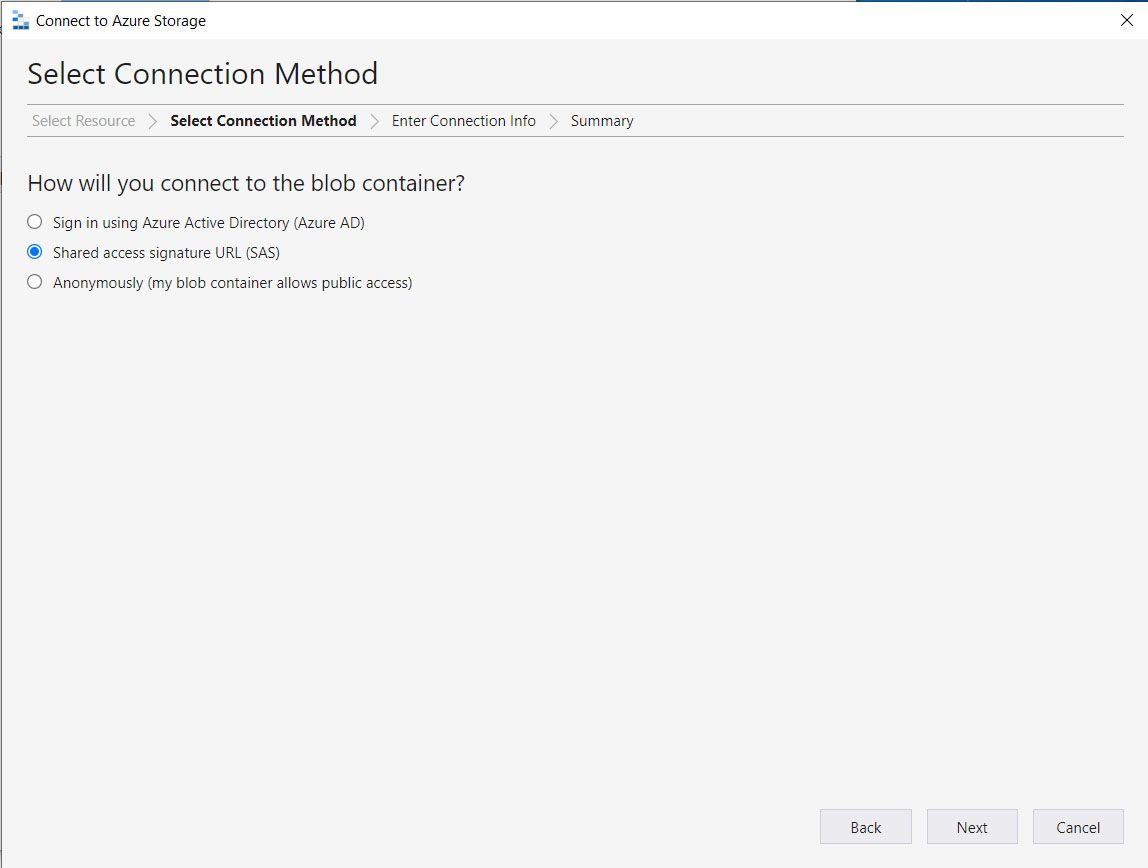
Then select Shared access signature URL and hit Next.
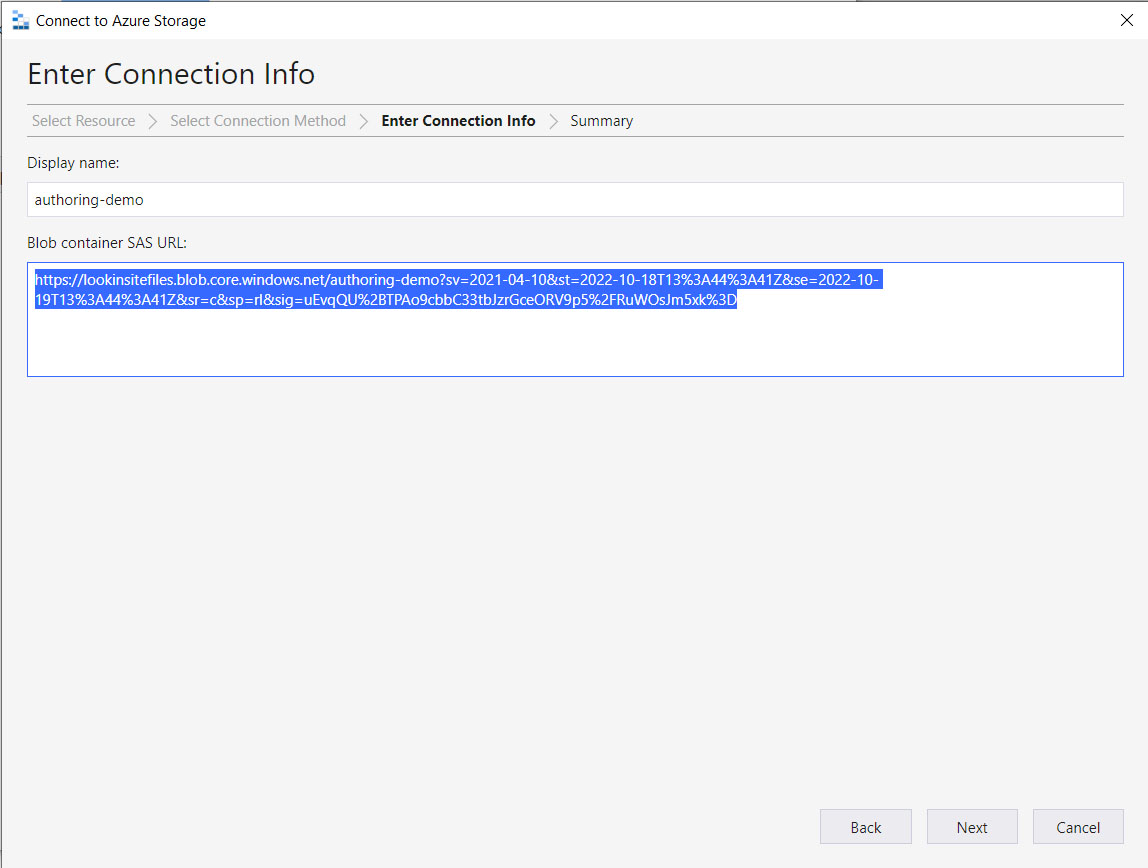
Paste the link we sent you into the box below and hit Next.
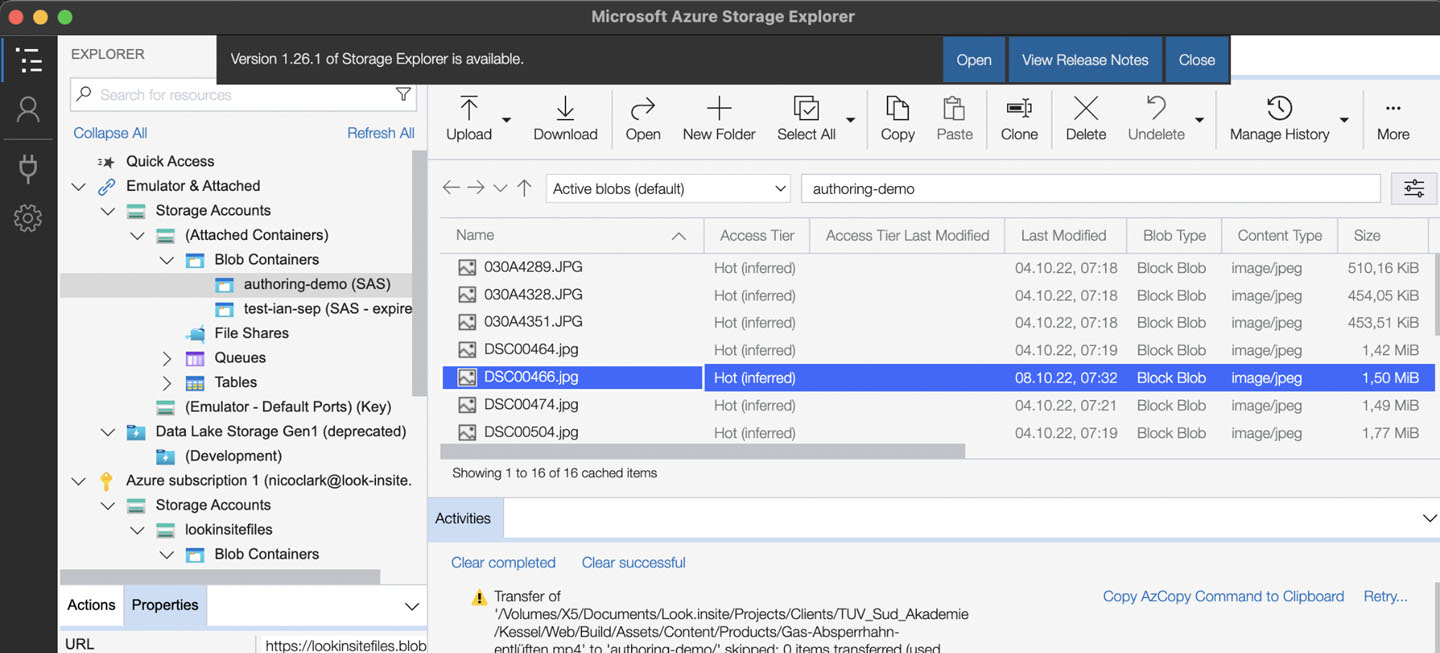
You will reach a confirmation page where you can check the details before connecting to the storage.

When you click Connect, your storage area will be opened. This one already has resources in it, but it might be empty and ready for you to add your content.
If you have any trouble using your storage, please contact us, and we will ensure it is available to you.
Missing Resources
It is important that the file name is written exactly as it appears in your storage area, including the suffix (e.g., .jpg, .JPG, .png, .mp4). The image name is a URL and, just like an email address, it must be written exactly to function correctly.
If the file name specified in the CMS does not match the name of a file in the storage area, a placeholder image will appear.
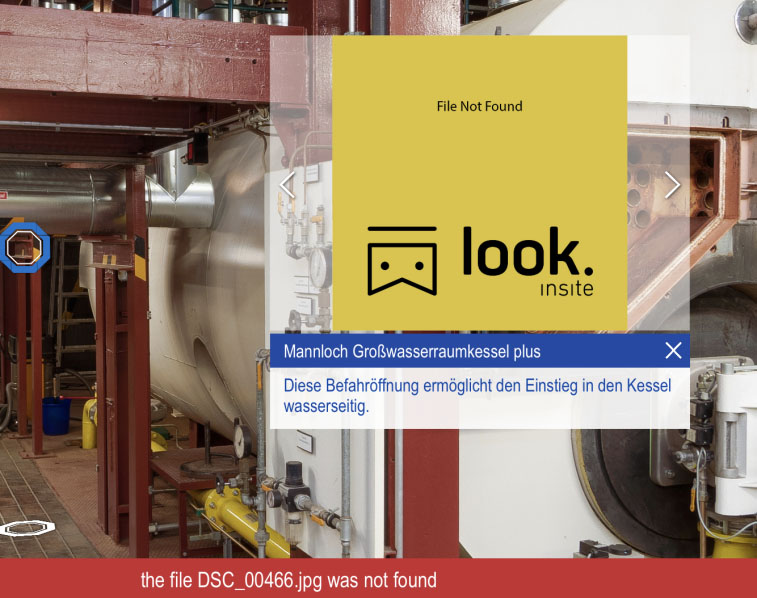
If the placeholder appears, please check the naming of your file against what you have written in the CMS.

You can see here that the file name has an underscore (‘_’) that does not appear in the actual file.
Special Characters in Resource Names
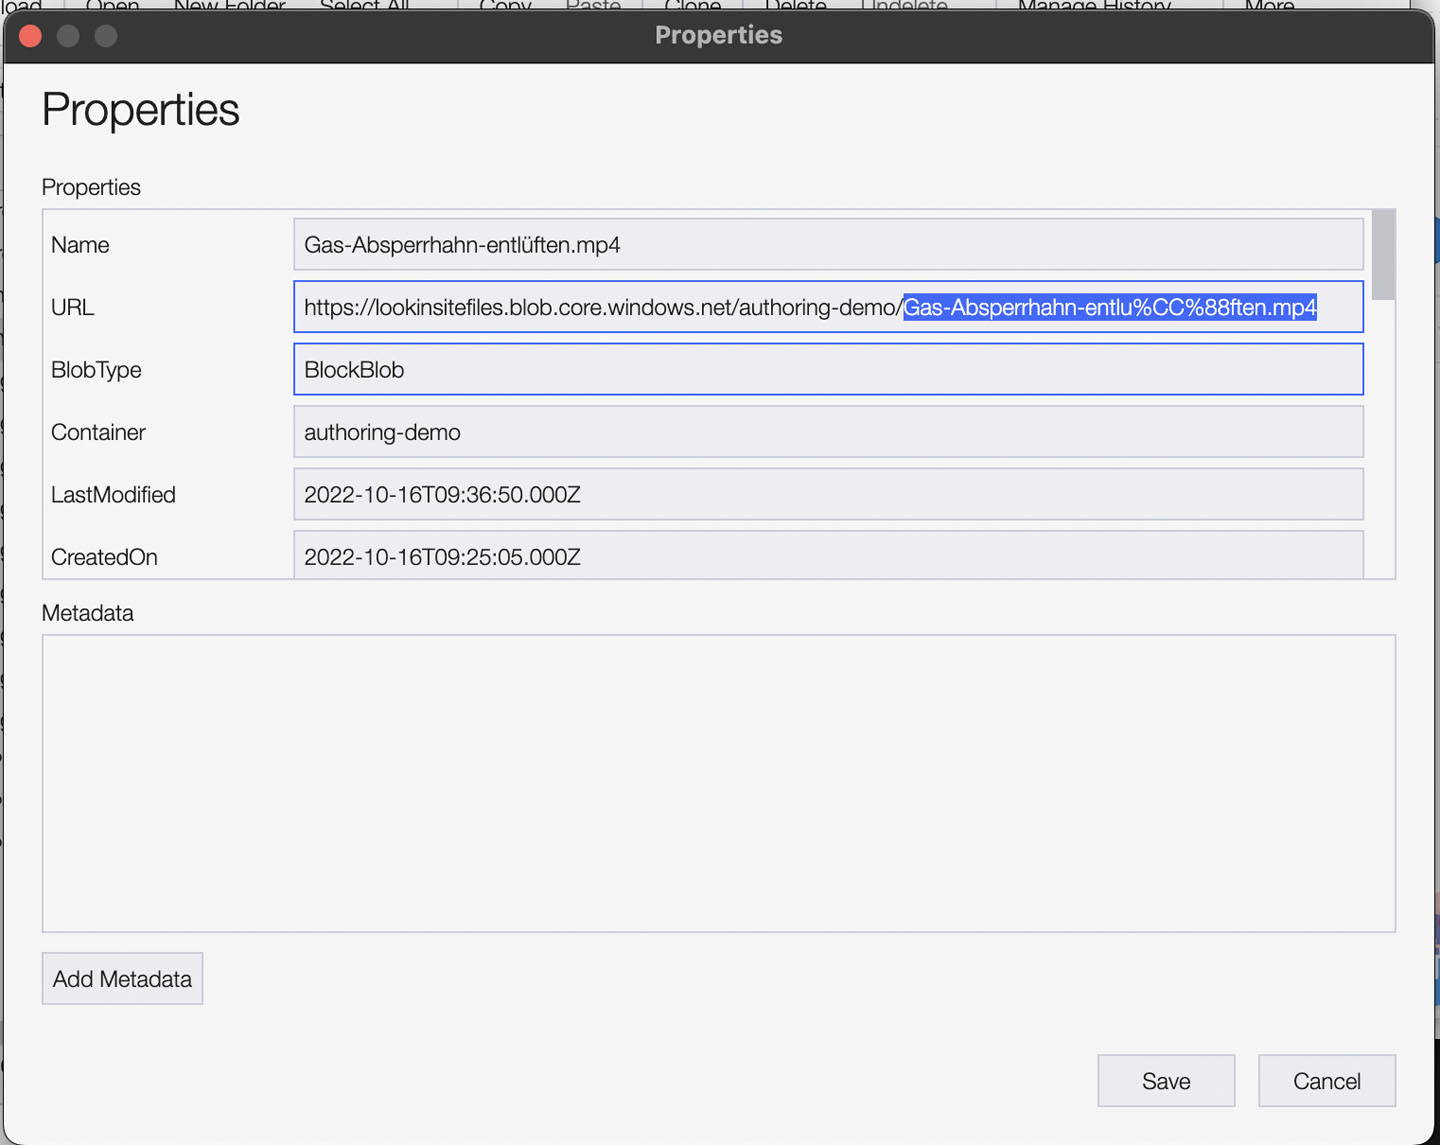
Similar to web addresses, umlauts and other special characters can cause issues when used as a file name. If you find an image is missing, it may be because the special characters have been automatically replaced by the storage tool. To check this, right-click on the file in Storage Explorer and look at its properties.
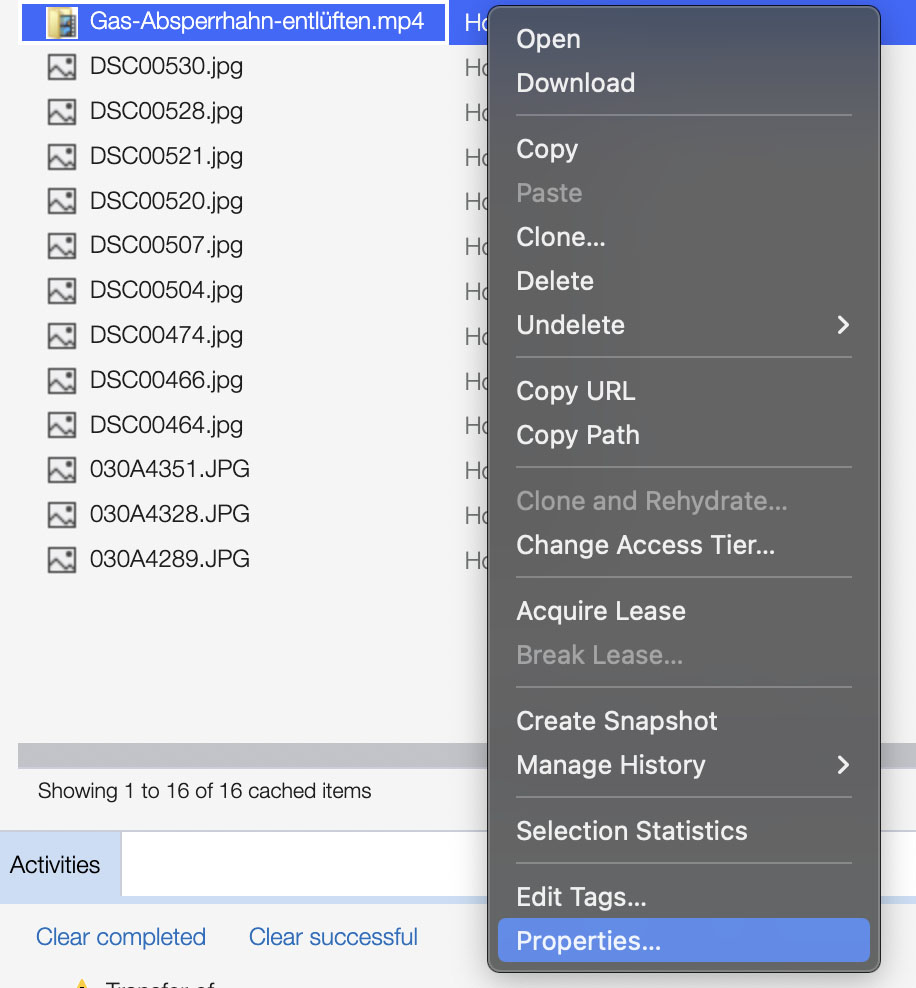
As you can see here, the ‘ü’ has been replaced by a complicated code. You can either copy this highlighted text into the CMS or replace the image file with one that does not include special characters.
Text Formatting in Menu Title and Image Label Fields
Commas and apostrophes in the Menu Title and Image label fields will not render accurately in your insite. Please use the following formatting shortcuts to replace them.
comma (,) = §
apostrophe (‘) = ª
In-Site Authoring
Authoring Online
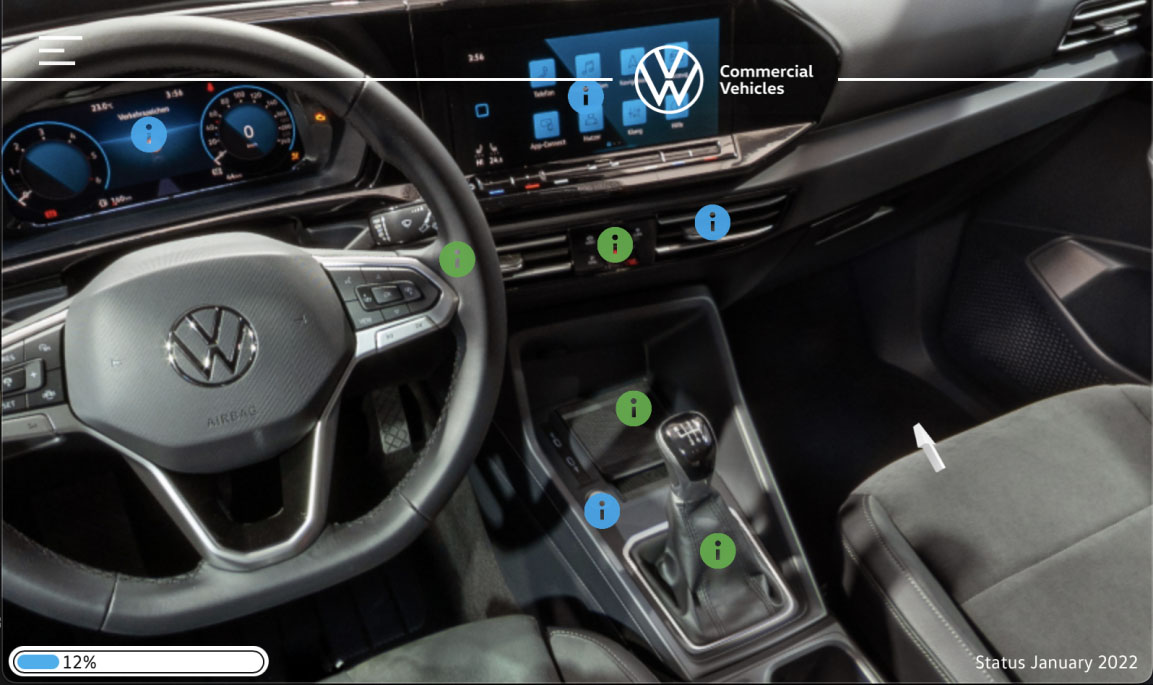
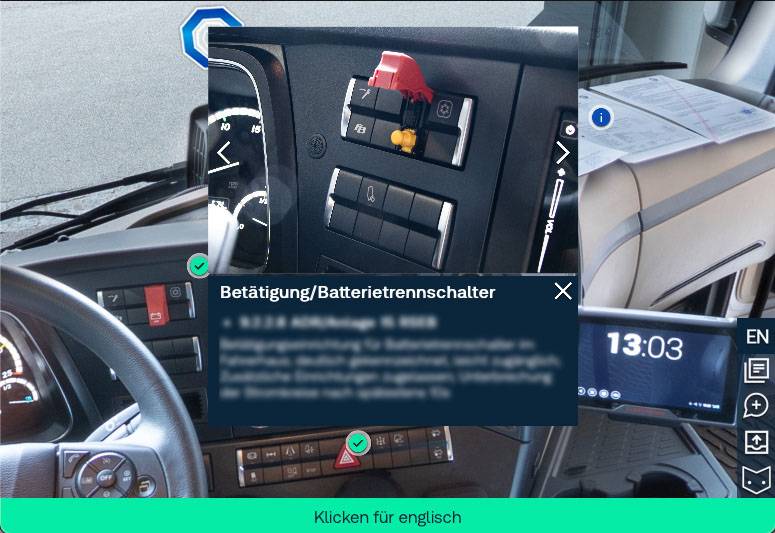
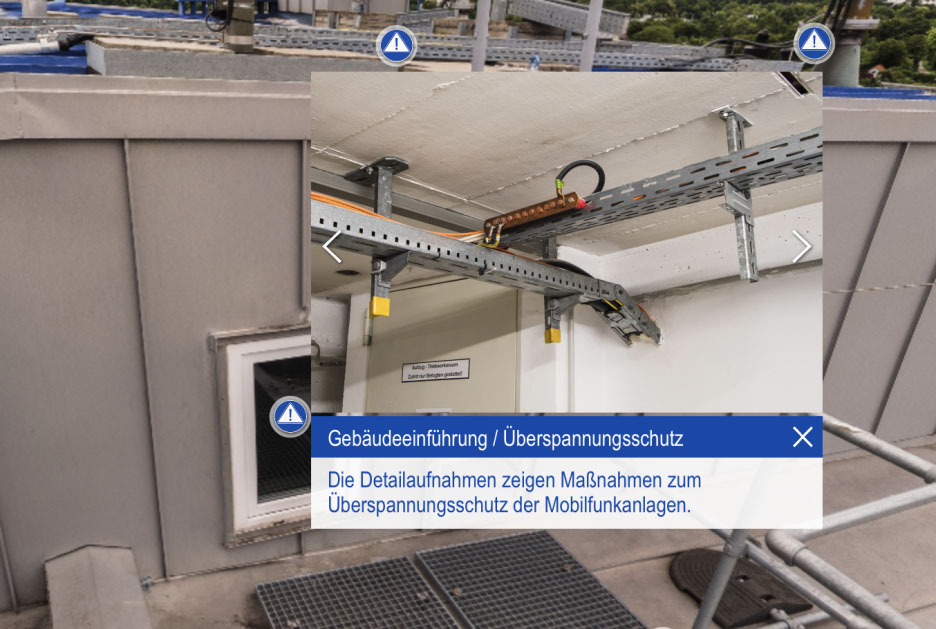
The items you have created in our content management system contain detailed information about actual objects or areas in a space that have been photographed or created in 3D. These appear as floating panels of text, image, and/or video within the 3D simulation. We call these info items.
In-Site Authoring defines the hotspot or live area in the 3D space which, when clicked, will trigger the display of a product. Normally, a product panel appears next to the object displaying text, images, PDFs, videos, or even links to other sites.
With Insites‘ authoring tools, you can specify where this object is in the 3D space from within the site itself. The same object may be visible from multiple vantage points or more than one may exist, so it is often necessary to define the same hotspot from multiple points of view.
Entering Authoring Mode
When building a new Insites project, you will have access to the authoring tools and content management system for a specific period. During this time, you can enter authoring mode whenever you access your project.
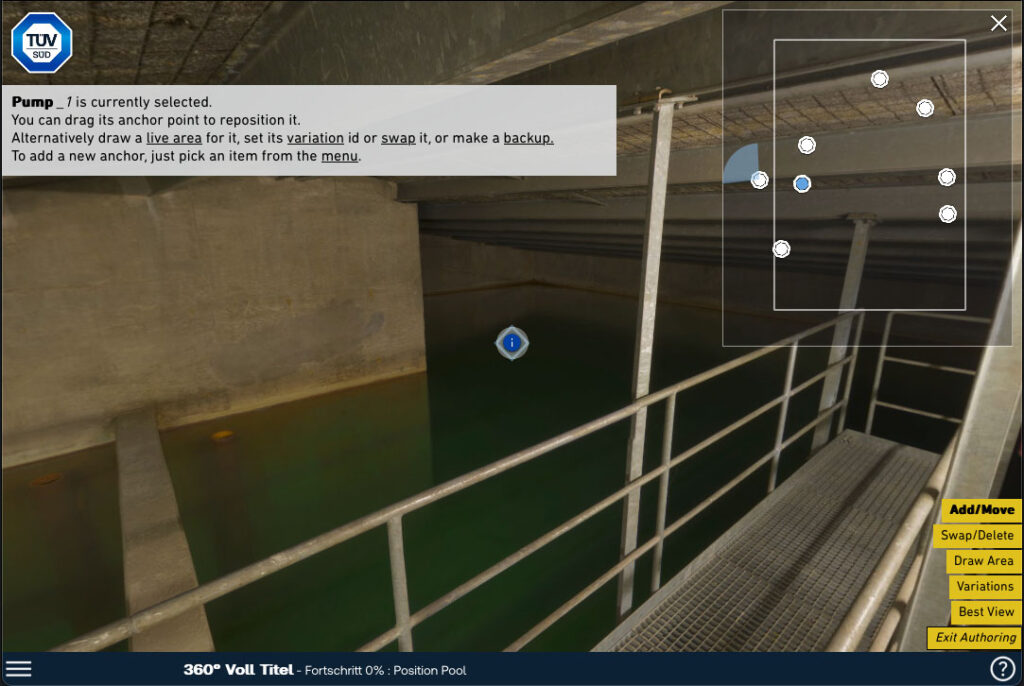
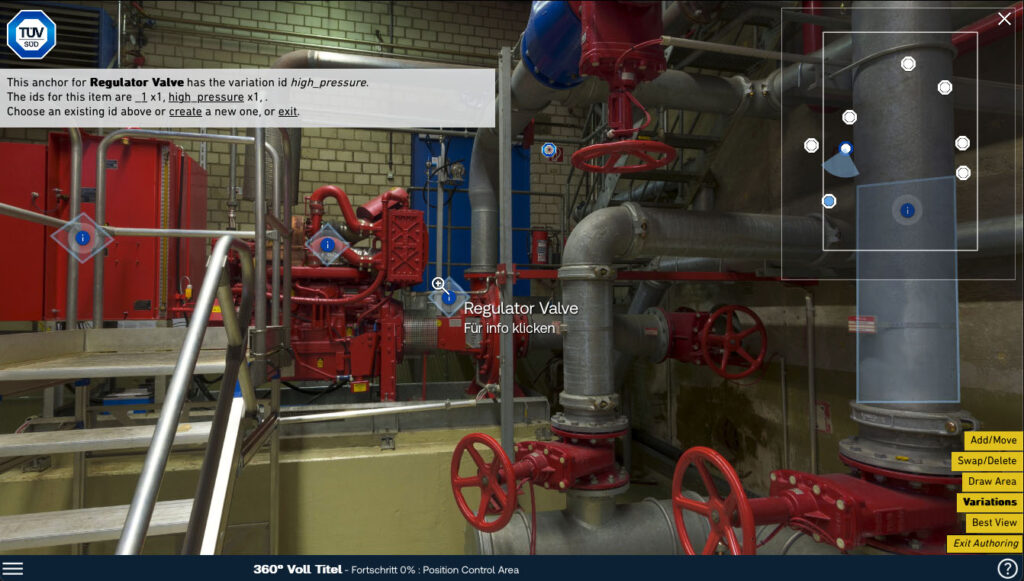
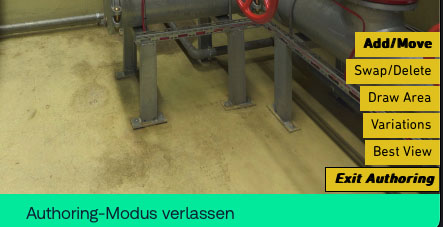
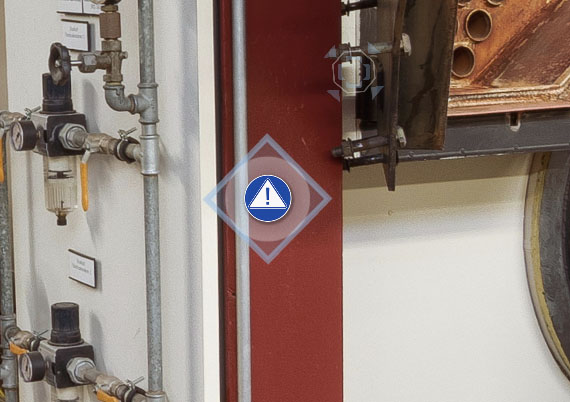
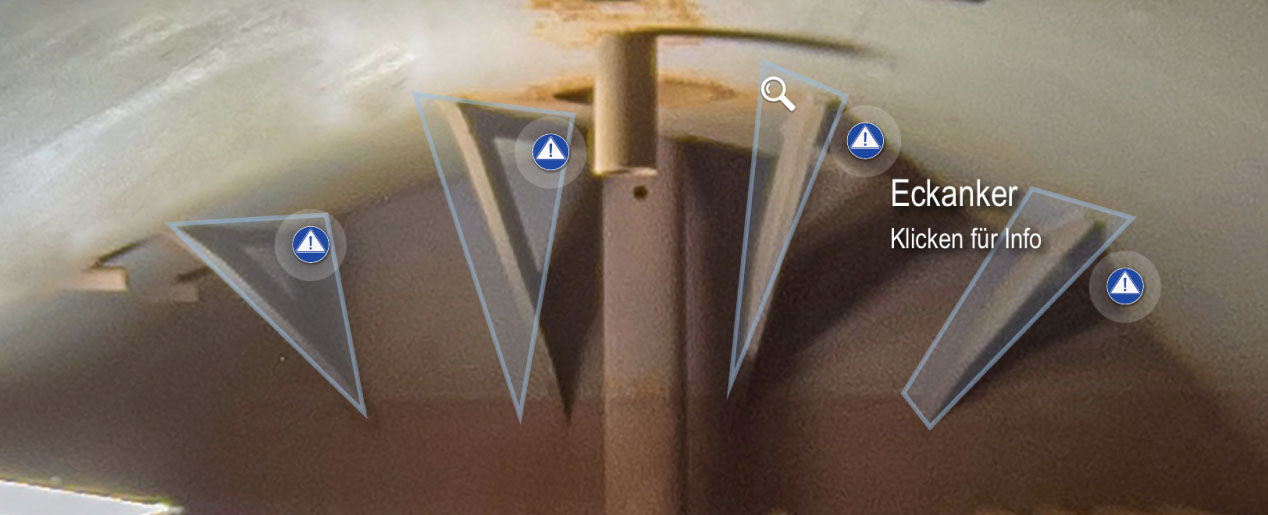
You’ll recognize authoring mode by the yellow button in the bottom-right corner. Clicking this button opens options for adding and editing hotspots within the 3D environment. When in authoring mode, all interactive hotspots will be highlighted with a light blue outline, indicating they are editable.
To see the site as an end user would, simply exit authoring mode, and you can test its functionality as it will appear once published.
Adding and Placing Hotspots
To add a hotspot to your scene, open the editing tool by clicking on the authoring button. It will automatically go into add/move mode. Then select the product from the bottom right-hand menu that you would like to add to this particular view.
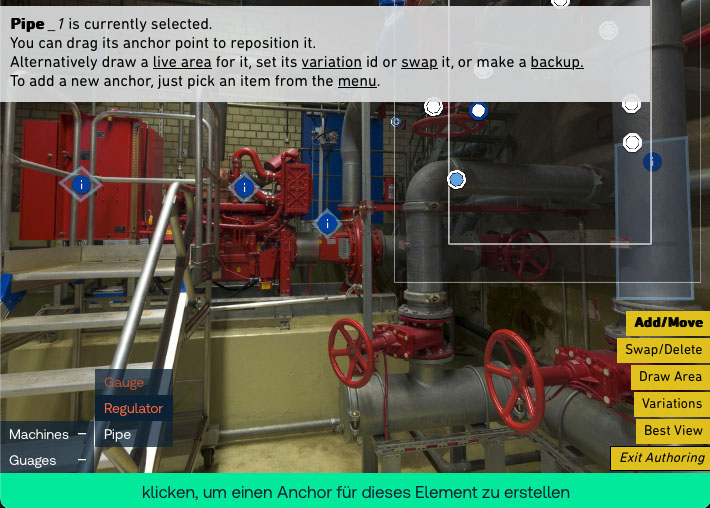
Your new hotspot is automatically placed directly in the middle of the screen; then you can drag it into its preferred position.
To move the hotspot, simply click and drag it. While you’re in add/move mode, if you hover over any hotspot, you can drag it into a new position. If you’ve already drawn a live area, the live area will be left behind, but if it’s sitting over a diamond shape, then it will come with it.

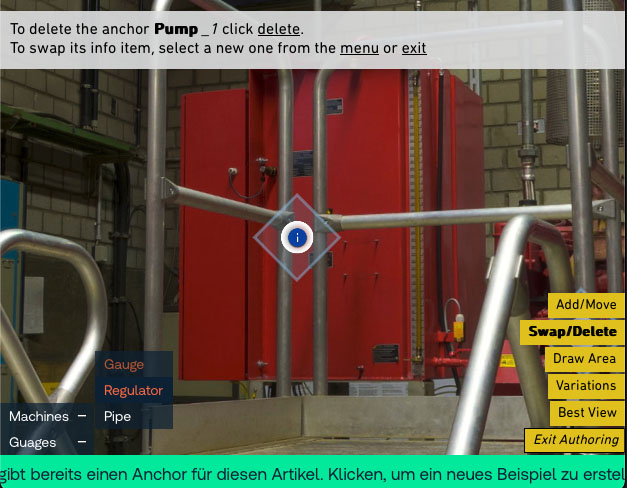
Deleting or Swapping a Hotspot
If you wish to remove a hotspot, click on the swap/delete button in authoring mode and then click on the hotspot you wish to delete.
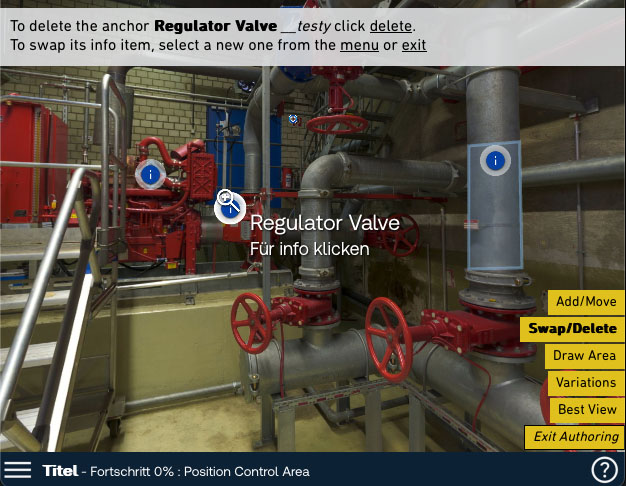
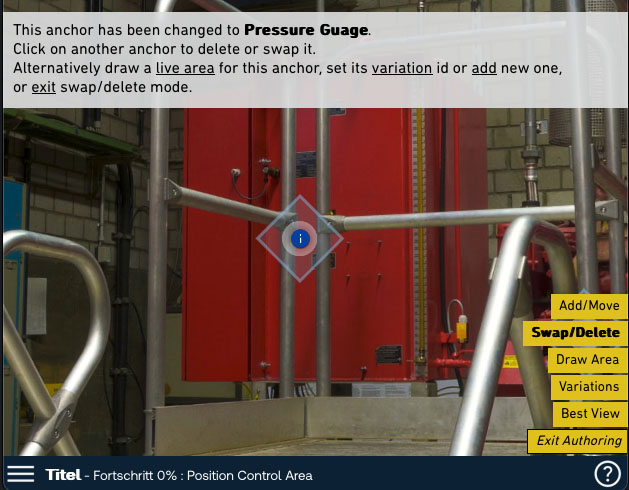
At this point, you have a choice to completely delete the hotspot or swap it for a different info item. If you want to delete it, simply click delete in the text box. If you would like to swap it for a different one, open the menu and select a different info item.
Variations & Examples
Info items can have the same content but appear in different variations or situations, or there may be more than one appearance of a product in the same view. We refer to these situations as variations.
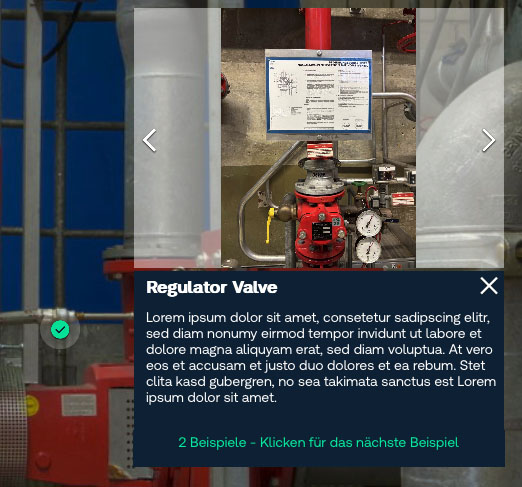
When you look at these examples in the published site, you’ll notice that there is an option to choose another example. These examples can exist in different views or in the same view.
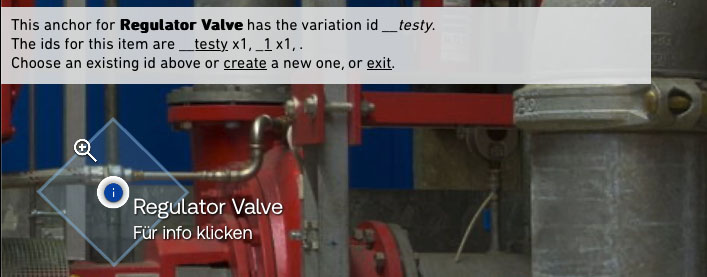
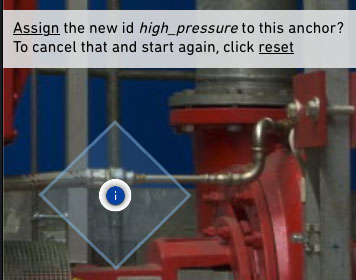
To create one, click on the variations tab and then select the specific hotspot of the info item you’d like to edit by clicking on it. You’ll have a choice either to create a new variation or to assign an existing variation to this particular hotspot.
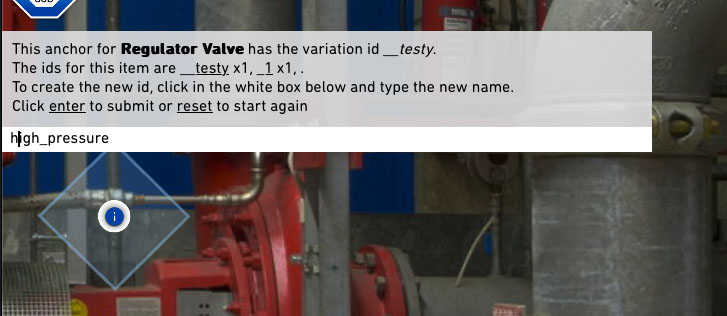
The wizard will help you to follow the steps to create your new variation. You always have the chance to re-edit the name that you write or to exit the whole process if it’s not correct. You can always start again.
Finding the best point of view for an info item
When you select an info item from the menu, it must be linked to a specific point of view. In some cases, the item may appear too small in the frame or be partially obscured. The Best View feature allows you to define the optimal perspective for each info item, ensuring clear visibility.
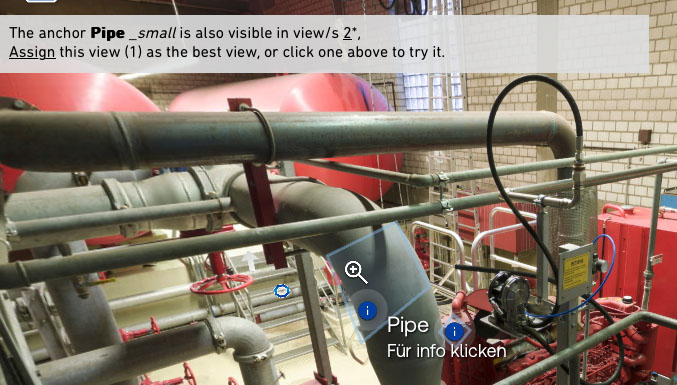
If your project includes variations, you’ll need to set a Best View for each one, so that when switching between examples, the most relevant perspective is always displayed. The authoring wizard simplifies this process—just select the Best View and follow the step-by-step instructions.
Publishing and Maintaining Your Insite
Delivery
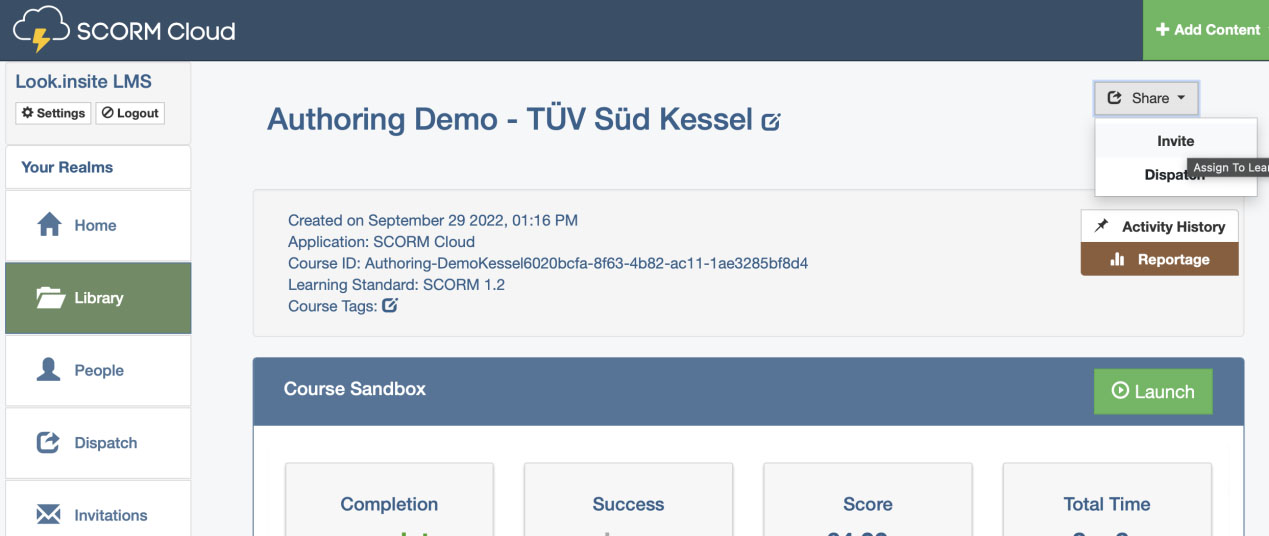
We provide you with access to your site for authoring through our LMS. When you’re satisfied that it is ready, you simply need to let us know. We will then bring all of the content together into a self-contained data package which we can publish for you or you can place on your own server or another LMS.
Editing and Updates
Your Insite is built to last, but things change. With our maintenance packages, you can pre-plan editing cycles where updates can be made to your content and also take advantage of the most recent developments in our platform. Please get in touch for further details.
We hope you enjoy creating your Insites!